Launch an Avalanche Validator on AWS with One Click
How to Launch an Avalanche Validator using AWS
With the intention of enabling developers and entrepreneurs to on-ramp into the Avalanche ecosystem with as little friction as possible, Ava Labs recently launched an offering to deploy an Avalanche Validator node via the AWS Marketplace. This tutorial will show the main steps required to get this node running and validating on the Avalanche Fuji testnet.
Product Overview
The Avalanche Validator node is available via the AWS Marketplace. There you'll find a high level product overview. This includes a product description, pricing information, usage instructions, support information and customer reviews. After reviewing this information you want to click the "Continue to Subscribe" button.
Subscribe to This Software
Once on the "Subscribe to this Software" page you will see a button which enables you to subscribe to this AWS Marketplace offering. In addition you'll see Terms of service including the seller's End User License Agreement and the AWS Privacy Notice. After reviewing these you want to click on the "Continue to Configuration" button.
Configure This Software
This page lets you choose a fulfillment option and software version to launch
this software. No changes are needed as the default settings are sufficient.
Leave the Fulfillment Option as 64-bit (x86) Amazon Machine Image (AMI). The
software version is the latest build of the AvalancheGo full
node, v1.9.5 (Dec 22, 2022), AKA Banff.5. This will always show the latest version. Also, the
Region to deploy in can be left as US East (N. Virginia). On the right you'll
see the software and infrastructure pricing. Lastly, click the "Continue to
Launch" button.
Launch This Software
Here you can review the launch configuration details and follow the instructions
to launch the Avalanche Validator Node. The changes are very minor. Leave the
action as "Launch from Website." The EC2 Instance Type should remain
c5.2xlarge. The primary change you'll need to make is to choose a keypair
which will enable you to ssh into the newly created EC2 instance to run curl
commands on the Validator node. You can search for existing Keypairs or you can
create a new keypair and download it to your local machine. If you create a new
keypair you'll need to move the keypair to the appropriate location, change the
permissions and add it to the OpenSSH authentication agent. For example, on
MacOS it would look similar to the following:
# In this example we have a keypair called avalanche.pem which was downloaded from AWS to ~/Downloads/avalanche.pem
# Confirm the file exists with the following command
test -f ~/Downloads/avalanche.pem && echo "avalance.pem exists."

# Running the above command will output the following:
# avalance.pem exists.

# Move the avalanche.pem keypair from the ~/Downloads directory to the hidden ~/.ssh directory
mv ~/Downloads/avalanche.pem ~/.ssh

# Next add the private key identity to the OpenSSH authentication agent
ssh-add ~/.ssh/avalanche.pem;

# Change file modes or Access Control Lists
sudo chmod 600 ~/.ssh/avalanche.pem
Once these steps are complete you are ready to launch the Validator node on EC2. To make that happen click the "Launch" button

You now have an Avalanche node deployed on an AWS EC2 instance! Copy
the AMI ID and click on the EC2 Console link for the next step.
EC2 Console
Now take the AMI ID from the previous step and input it into the search bar
on the EC2 Console. This will bring you to the dashboard where you can find the
EC2 instances public IP address.
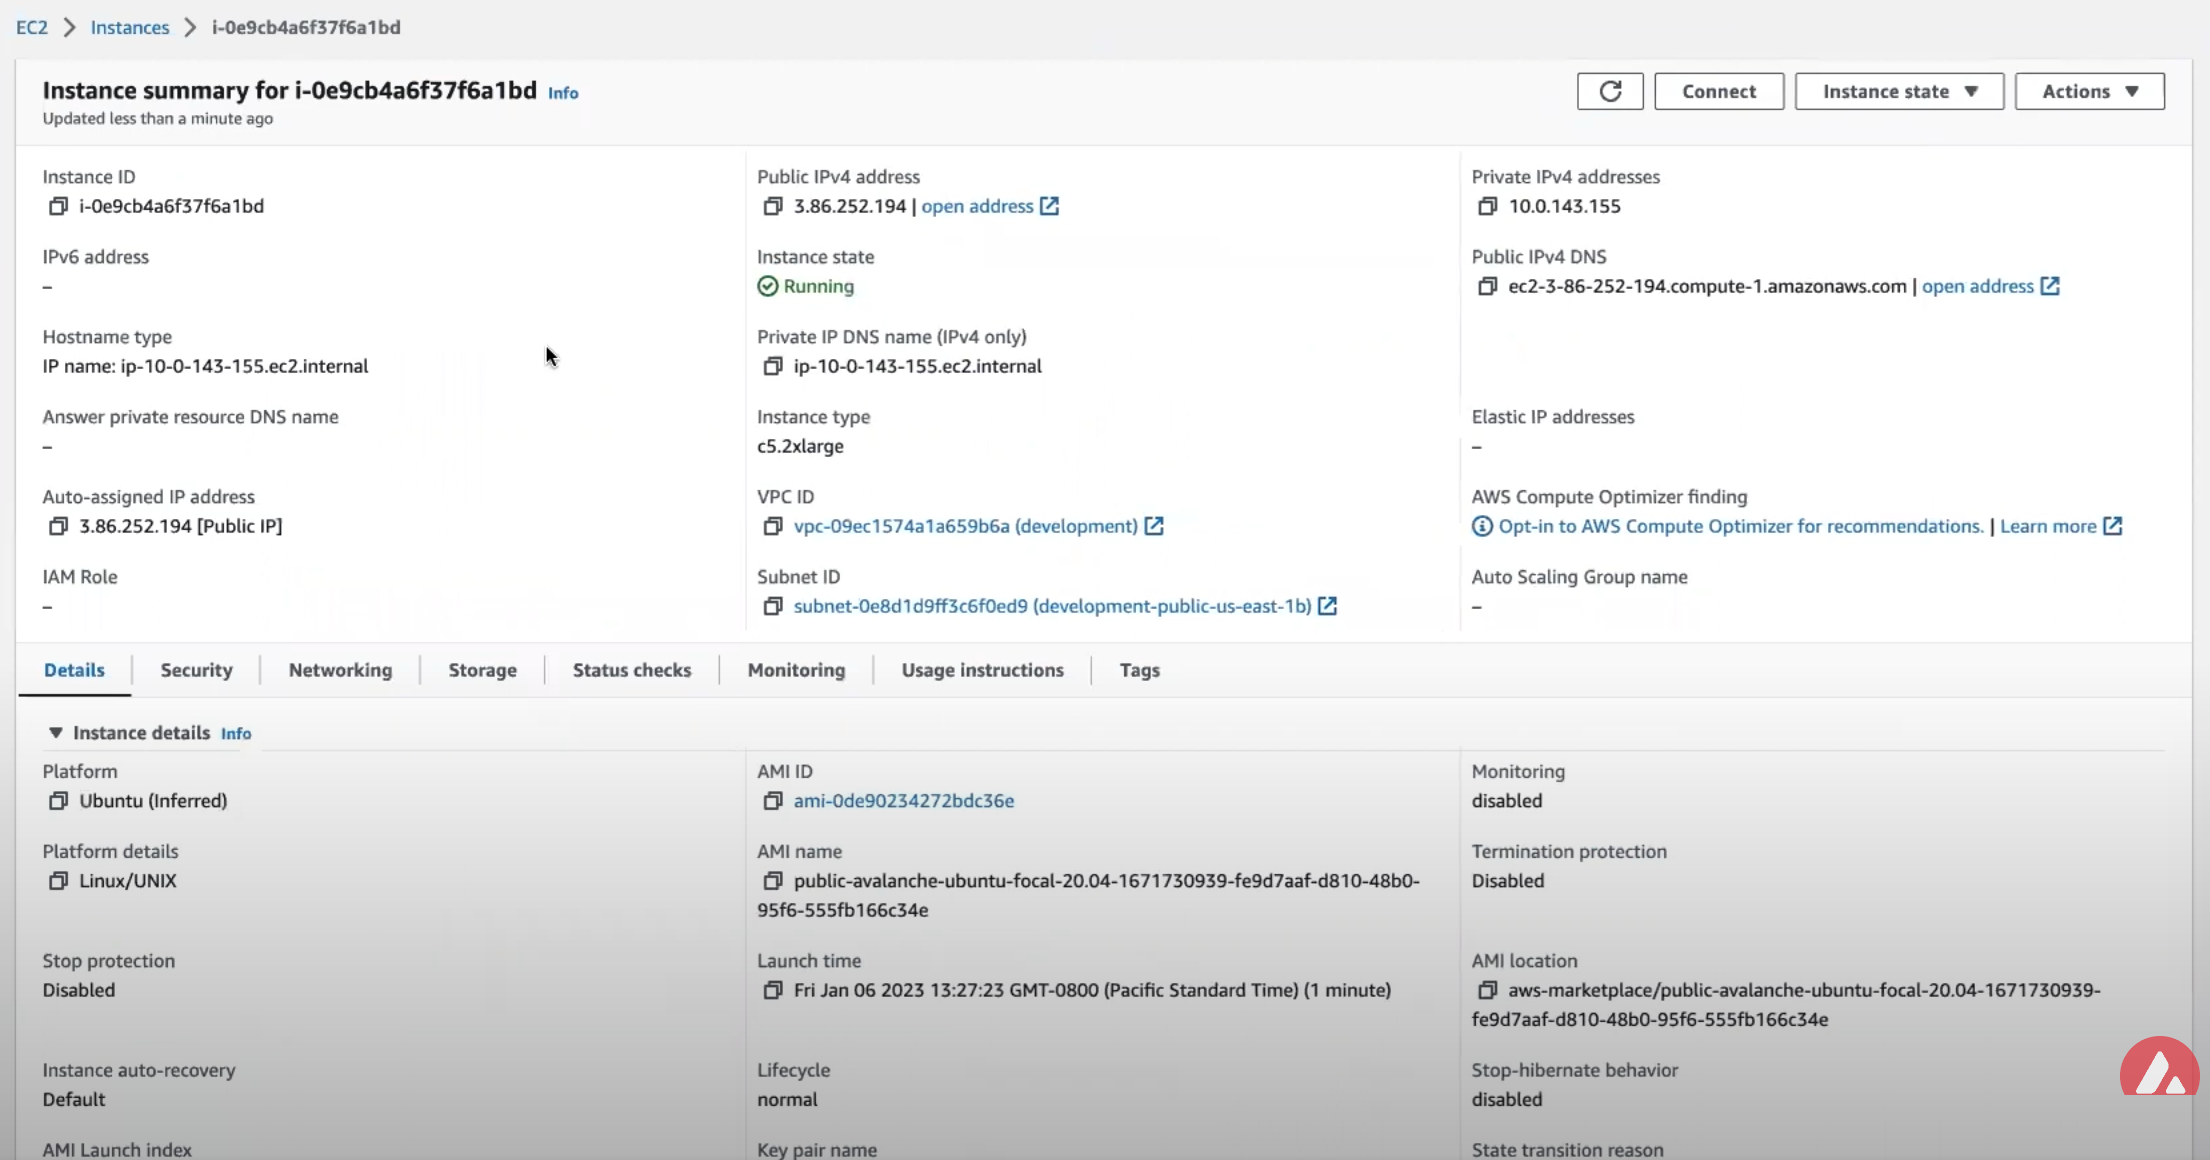
Copy that public IP address and open a Terminal or command line prompt. Once you
have the new Terminal open ssh into the EC2 instance with the following
command.
Node Configuration
Switch to Fuji Testnet
By default the Avalanche Node available through the AWS Marketplace syncs the Mainnet. If this is what you are looking for, you can skip this step.
For this tutorial you want to sync and validate the Fuji Testnet. Now
that you're sshed into the EC2 instance you can make the required changes to
sync Fuji instead of Mainnet.
First, confirm that the node is syncing the Mainnet by running the info.getNetworkID command.
info.getNetworkID Request
curl -X POST --data '{
    "jsonrpc":"2.0",
    "id"     :1,
    "method" :"info.getNetworkID",
    "params": {
    }
}' -H 'content-type:application/json;' 127.0.0.1:9650/ext/info
info.getNetworkID Response
The returned networkID will be 1 which is the network ID for Mainnet.
{
  "jsonrpc": "2.0",
  "result": {
    "networkID": "1"
  },
  "id": 1
}
Now you want to edit /etc/avalanchego/conf.json and change the "network-id"
property from "mainnet" to "fuji". To see the contents of
/etc/avalanchego/conf.json you can cat the file.
cat /etc/avalanchego/conf.json
{
  "api-keystore-enabled": false,
  "http-host": "0.0.0.0",
  "log-dir": "/var/log/avalanchego",
  "db-dir": "/data/avalanchego",
  "api-admin-enabled": false,
  "public-ip-resolution-service": "opendns",
  "network-id": "mainnet"
}
Edit that /etc/avalanchego/conf.json with your favorite text editor and change the value of the
"network-id" property from "mainnet" to "fuji". Once that's complete,
save the file and restart the Avalanche node via sudo systemctl restart avalanchego.
You can then call the info.getNetworkID endpoint to confirm the
change was successful.
info.getNetworkID Request
curl -X POST --data '{
    "jsonrpc":"2.0",
    "id"     :1,
    "method" :"info.getNetworkID",
    "params": {
    }
}' -H 'content-type:application/json;' 127.0.0.1:9650/ext/info
info.getNetworkID Response
The returned networkID will be 5 which is the network ID for Fuji.
{
  "jsonrpc": "2.0",
  "result": {
    "networkID": "5"
  },
  "id": 1
}
Next you run the info.isBoostrapped command to confirm if the Avalanche Validator node has
finished bootstrapping.
info.isBootstrapped Request
curl -X POST --data '{
    "jsonrpc":"2.0",
    "id"     :1,
    "method" :"info.isBootstrapped",
    "params": {
        "chain":"P"
    }
}' -H 'content-type:application/json;' 127.0.0.1:9650/ext/info
Once the node is finished bootstrapping, the response will be:
info.isBootstrapped Response
{
    "jsonrpc": "2.0",
    "result": {
        "isBootstrapped": true
    },
    "id": 1
}
Note that initially the response is false because the network is still syncing.
When you're adding your node as a Validator on the Avalanche Mainnet you'll want to wait for this response
to return true so that you don't suffer from any downtime while validating.
For this tutorial you're not going to wait for it to finish syncing as it's not
strictly necessary.
info.getNodeID Request
Next, you want to get the NodeID which will be used to add the node as a
Validator. To get the node's ID you call the info.getNodeID jsonrpc endpoint.
curl --location --request POST 'http://127.0.0.1:9650/ext/info' \
--header 'Content-Type: application/json' \
--data-raw '{
    "jsonrpc":"2.0",
    "id"     :1,
    "method" :"info.getNodeID",
    "params" :{
    }
}'
info.getNodeID Response
Take a note of the nodeID value which is returned as you'll need to use it in
the next step when adding a validator via the Avalanche Web Wallet. In this case
the nodeID is NodeID-Q8Gfaaio9FAqCmZVEXDq9bFvNPvDi7rt5
{
  "jsonrpc": "2.0",
  "result": {
    "nodeID": "NodeID-Q8Gfaaio9FAqCmZVEXDq9bFvNPvDi7rt5",
    "nodePOP": {
      "publicKey": "0x85675db18b326a9585bfd43892b25b71bf01b18587dc5fac136dc5343a9e8892cd6c49b0615ce928d53ff5dc7fd8945d",
      "proofOfPossession": "0x98a56f092830161243c1f1a613ad68a7f1fb25d2462ecf85065f22eaebb4e93a60e9e29649a32252392365d8f628b2571174f520331ee0063a94473f8db6888fc3a722be330d5c51e67d0d1075549cb55376e1f21d1b48f859ef807b978f65d9"
    }
  },
  "id": 1
}
Add Node as Validator on Fuji via Core web
For adding the new node as a Validator on the Fuji testnet's Primary Network you can use the Core web connected to Core extension. If you don't have a Core extension already, check out this guide. If you'd like to import an existing wallet to Core extension, follow these steps.
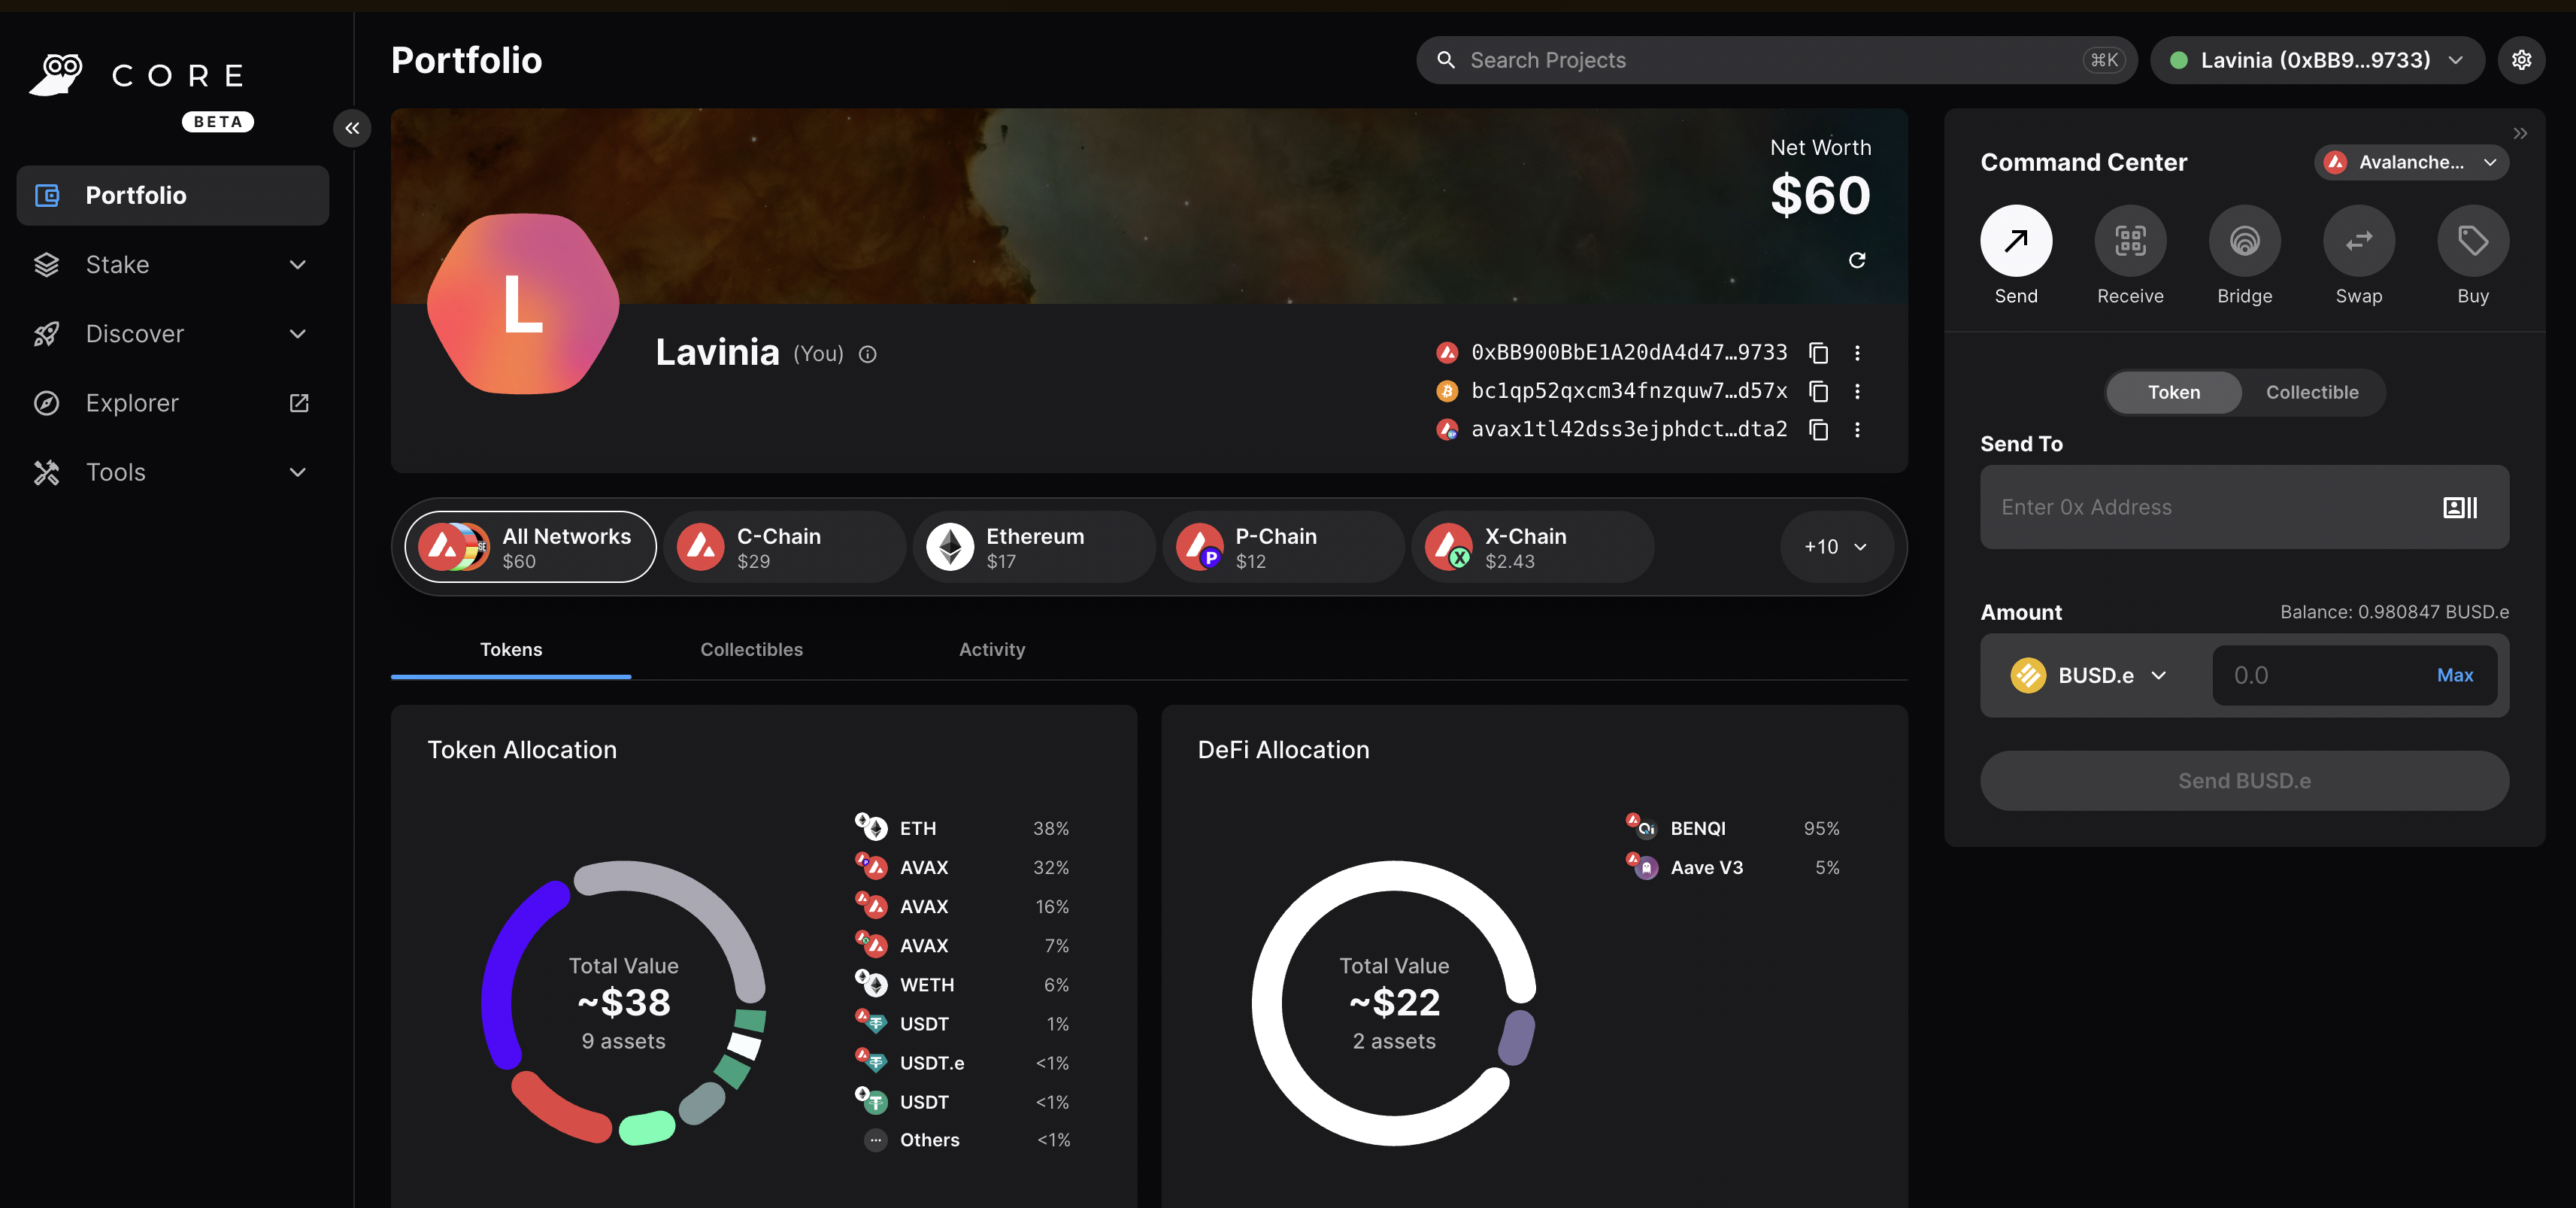
Core web is a free, all-in-one command center that gives users a more intuitive and comprehensive way to view assets, and use dApps across the Avalanche network, its various Subnets, and Ethereum. Core web is optimized for use with the Core browser extension and Core mobile (available on both iOS & Android). Together, they are key components of the Core product suite that brings dApps, NFTs, Avalanche Bridge, Subnets, L2s, and more, directly to users.
Switching to Testnet Mode
By default, Core web and Core extension are connected to Mainnet. For the sake of this demo, you want to connect to the Fuji Testnet.
On Core Extension
From the hamburger menu on the top-left corner, choose Advanced, and then toggle the Testnet Mode on.
You can follow the same steps for switching back to Mainnet.
On Core web
Click on the Settings button top-right corner of the page, then toggle Testnet Mode on.
You can follow the same steps for switching back to Mainnet.
Adding the Validator
-
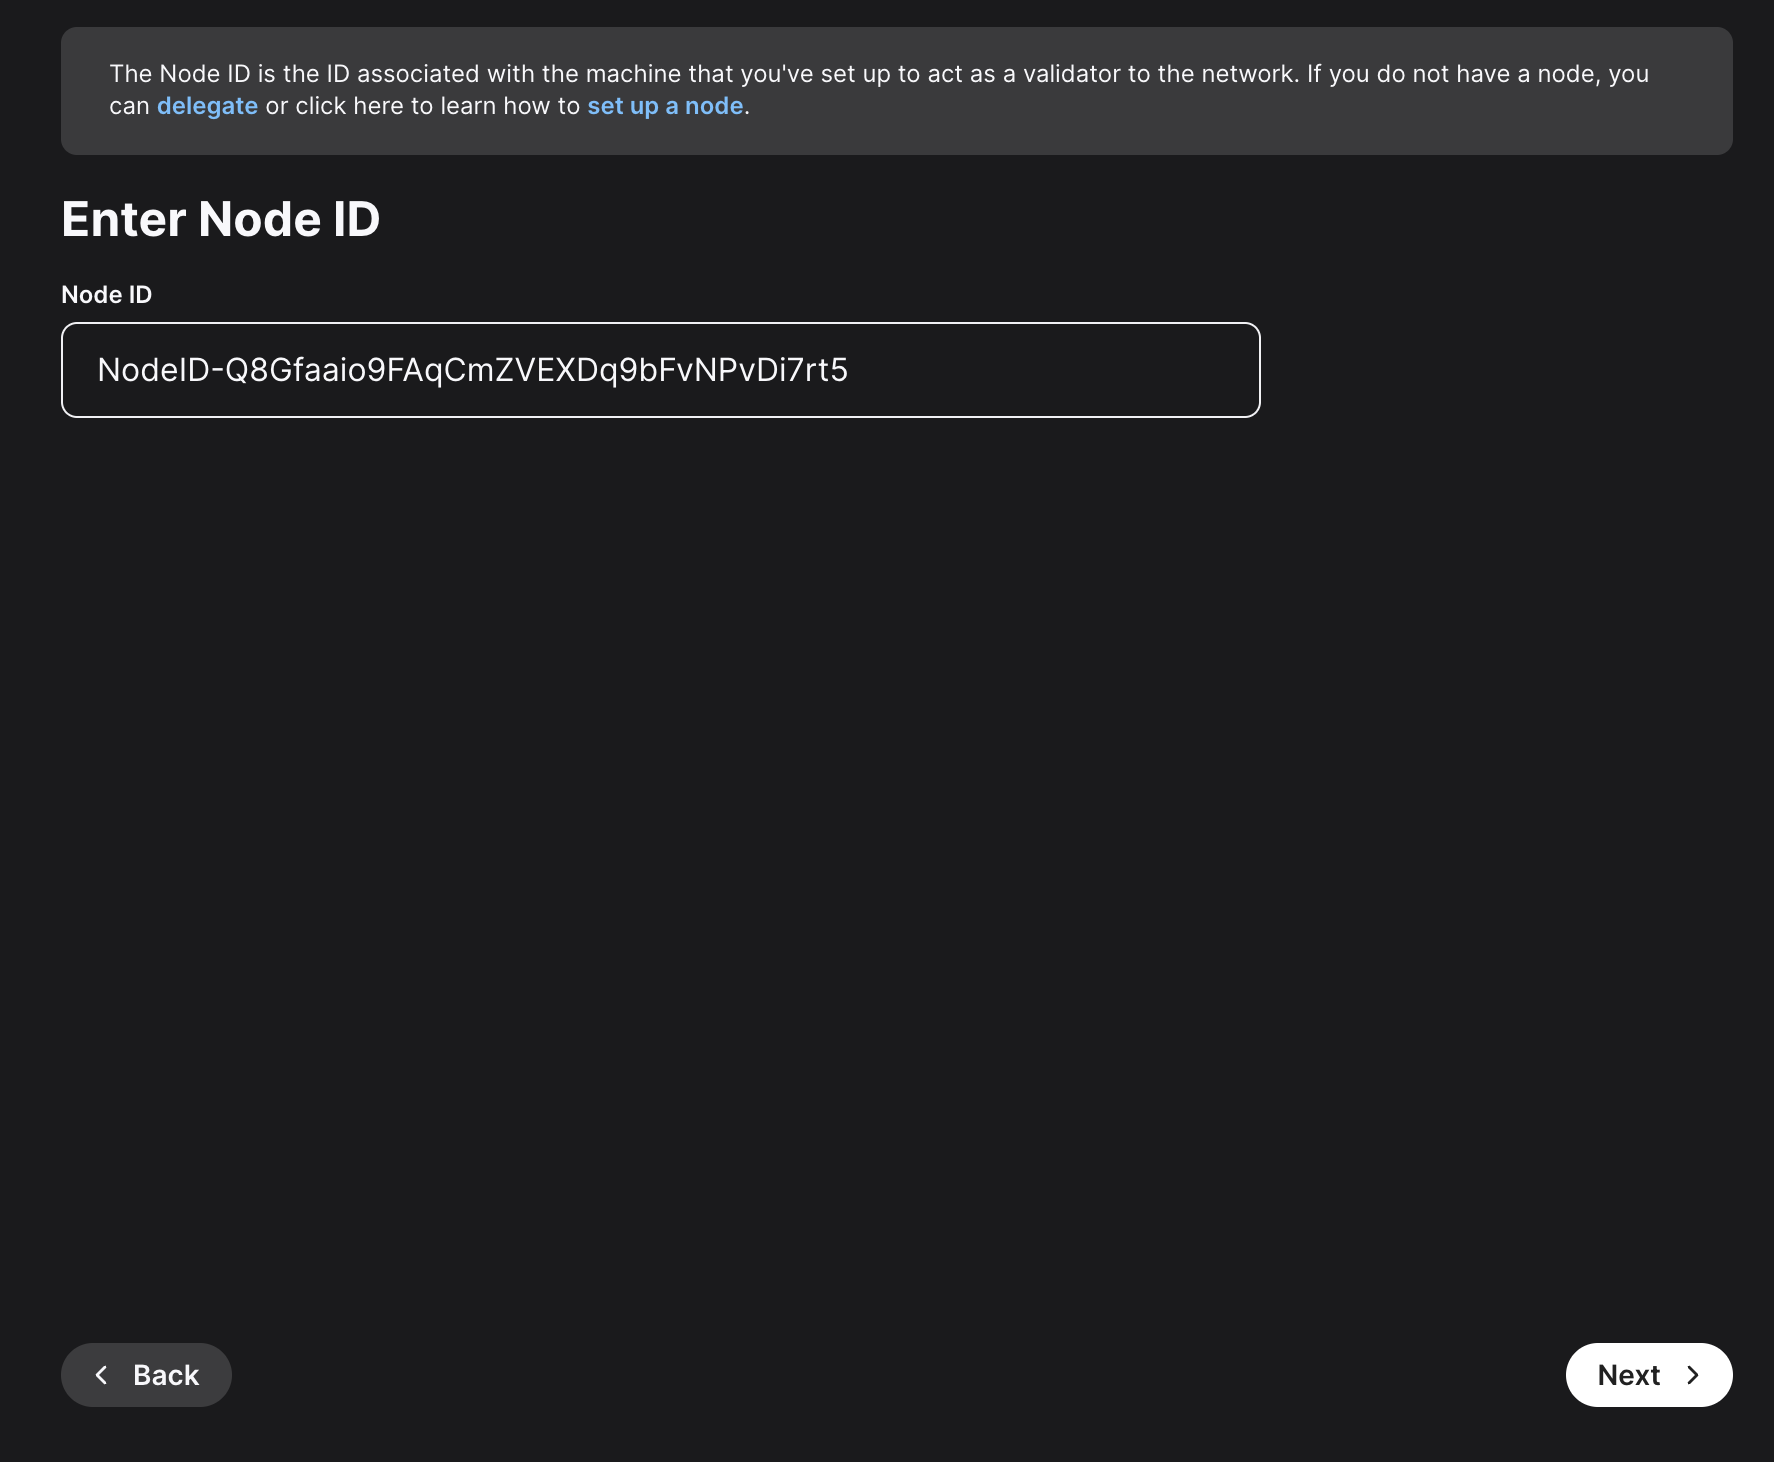
Node ID: A unique ID derived from each individual node’s staker certificate. Use the
NodeIDwhich was returned in theinfo.getNodeIDresponse. In this example it'sNodeID-Q8Gfaaio9FAqCmZVEXDq9bFvNPvDi7rt5 -
Staking End Date: Your AVAX tokens will be locked until this date.
-
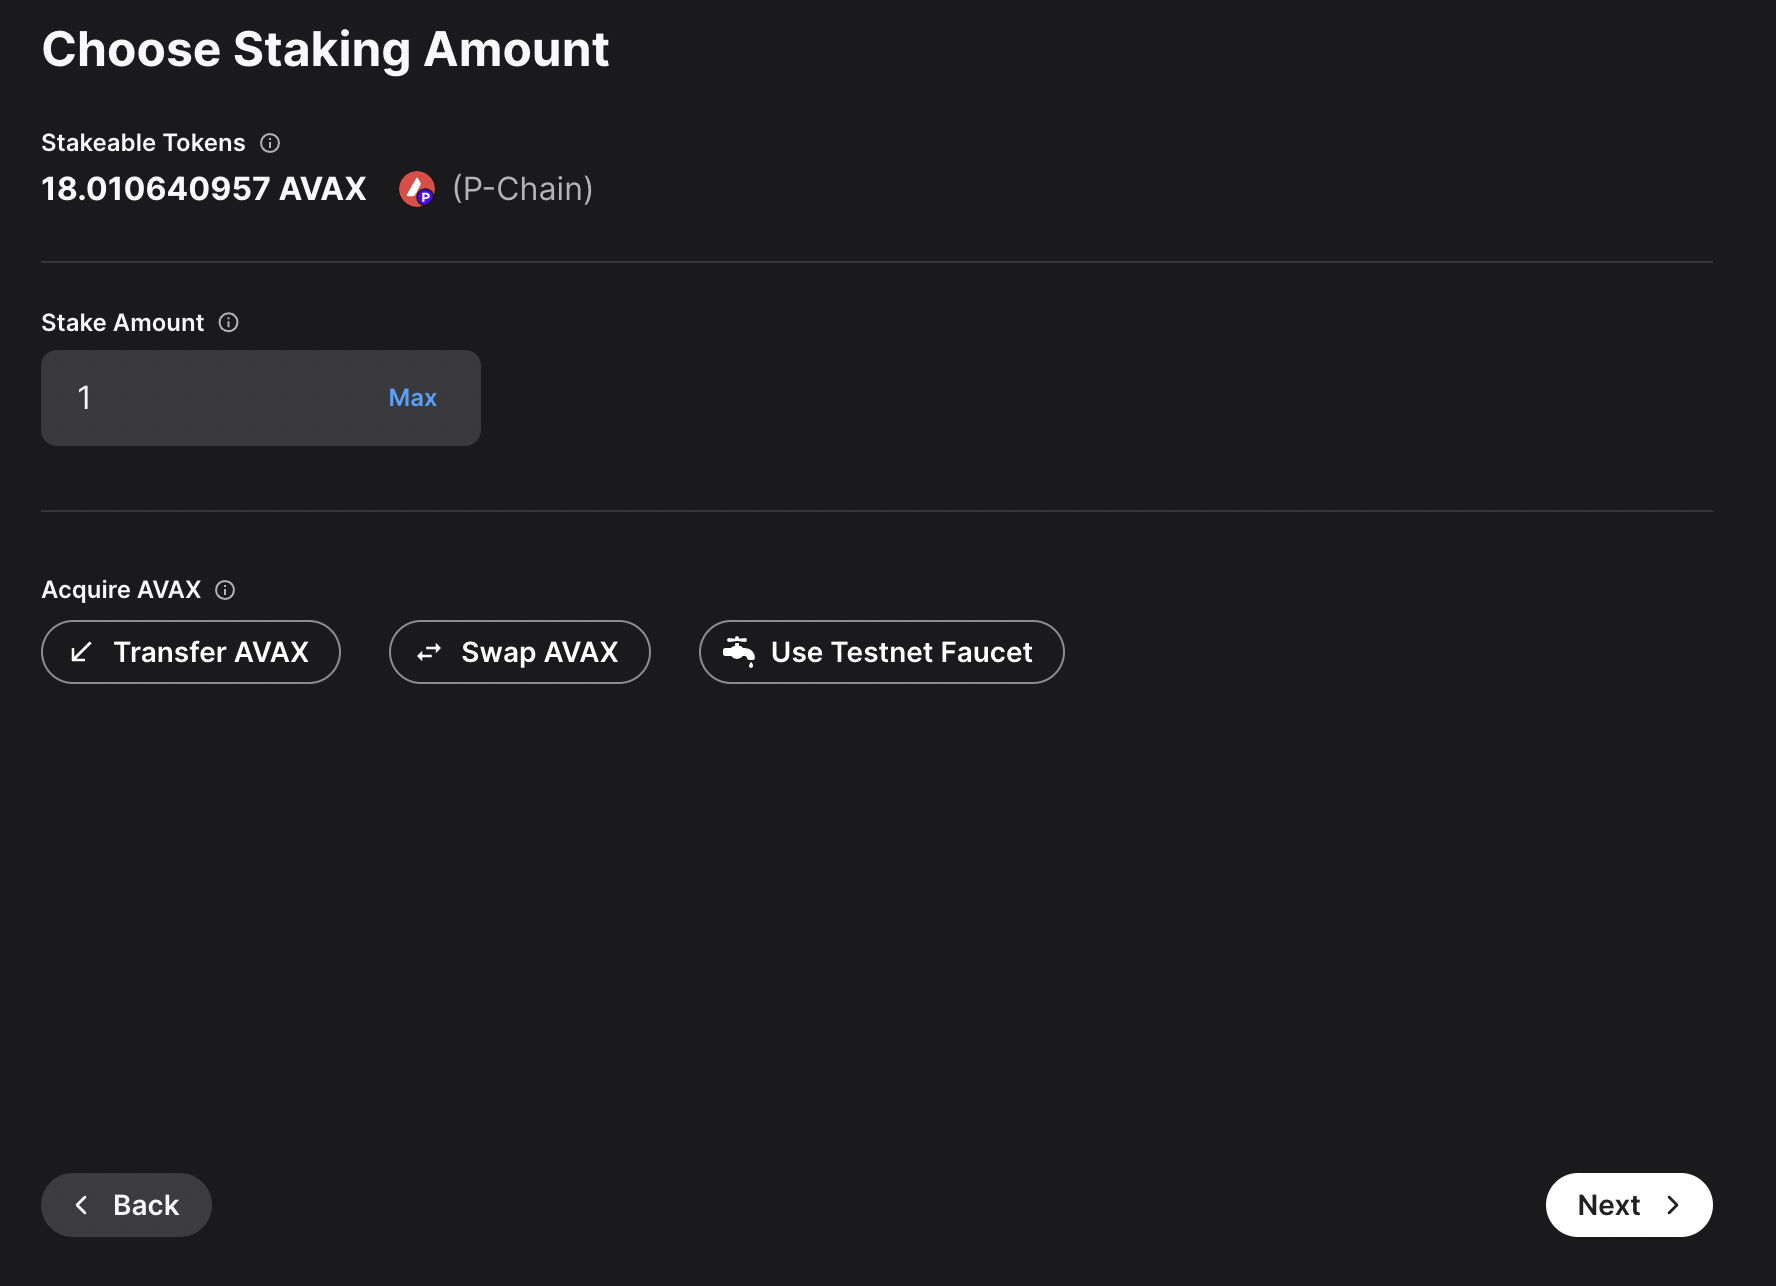
Stake Amount: The amount of AVAX to lock for staking. On Mainnet, the minimum required amount is 2,000 AVAX. On Testnet the minimum required amount is 1 AVAAX.
-
Delegation Fee: You will claim this % of the rewards from the delegators on your node.
-
Reward Address: A reward address is the destination address of the accumulated staking rewards.
To add a node as a Validator, first select the Stake tab on Core web, in the left hand nav menu. Next click the Validate button, and select Get Started.
This page will open up.
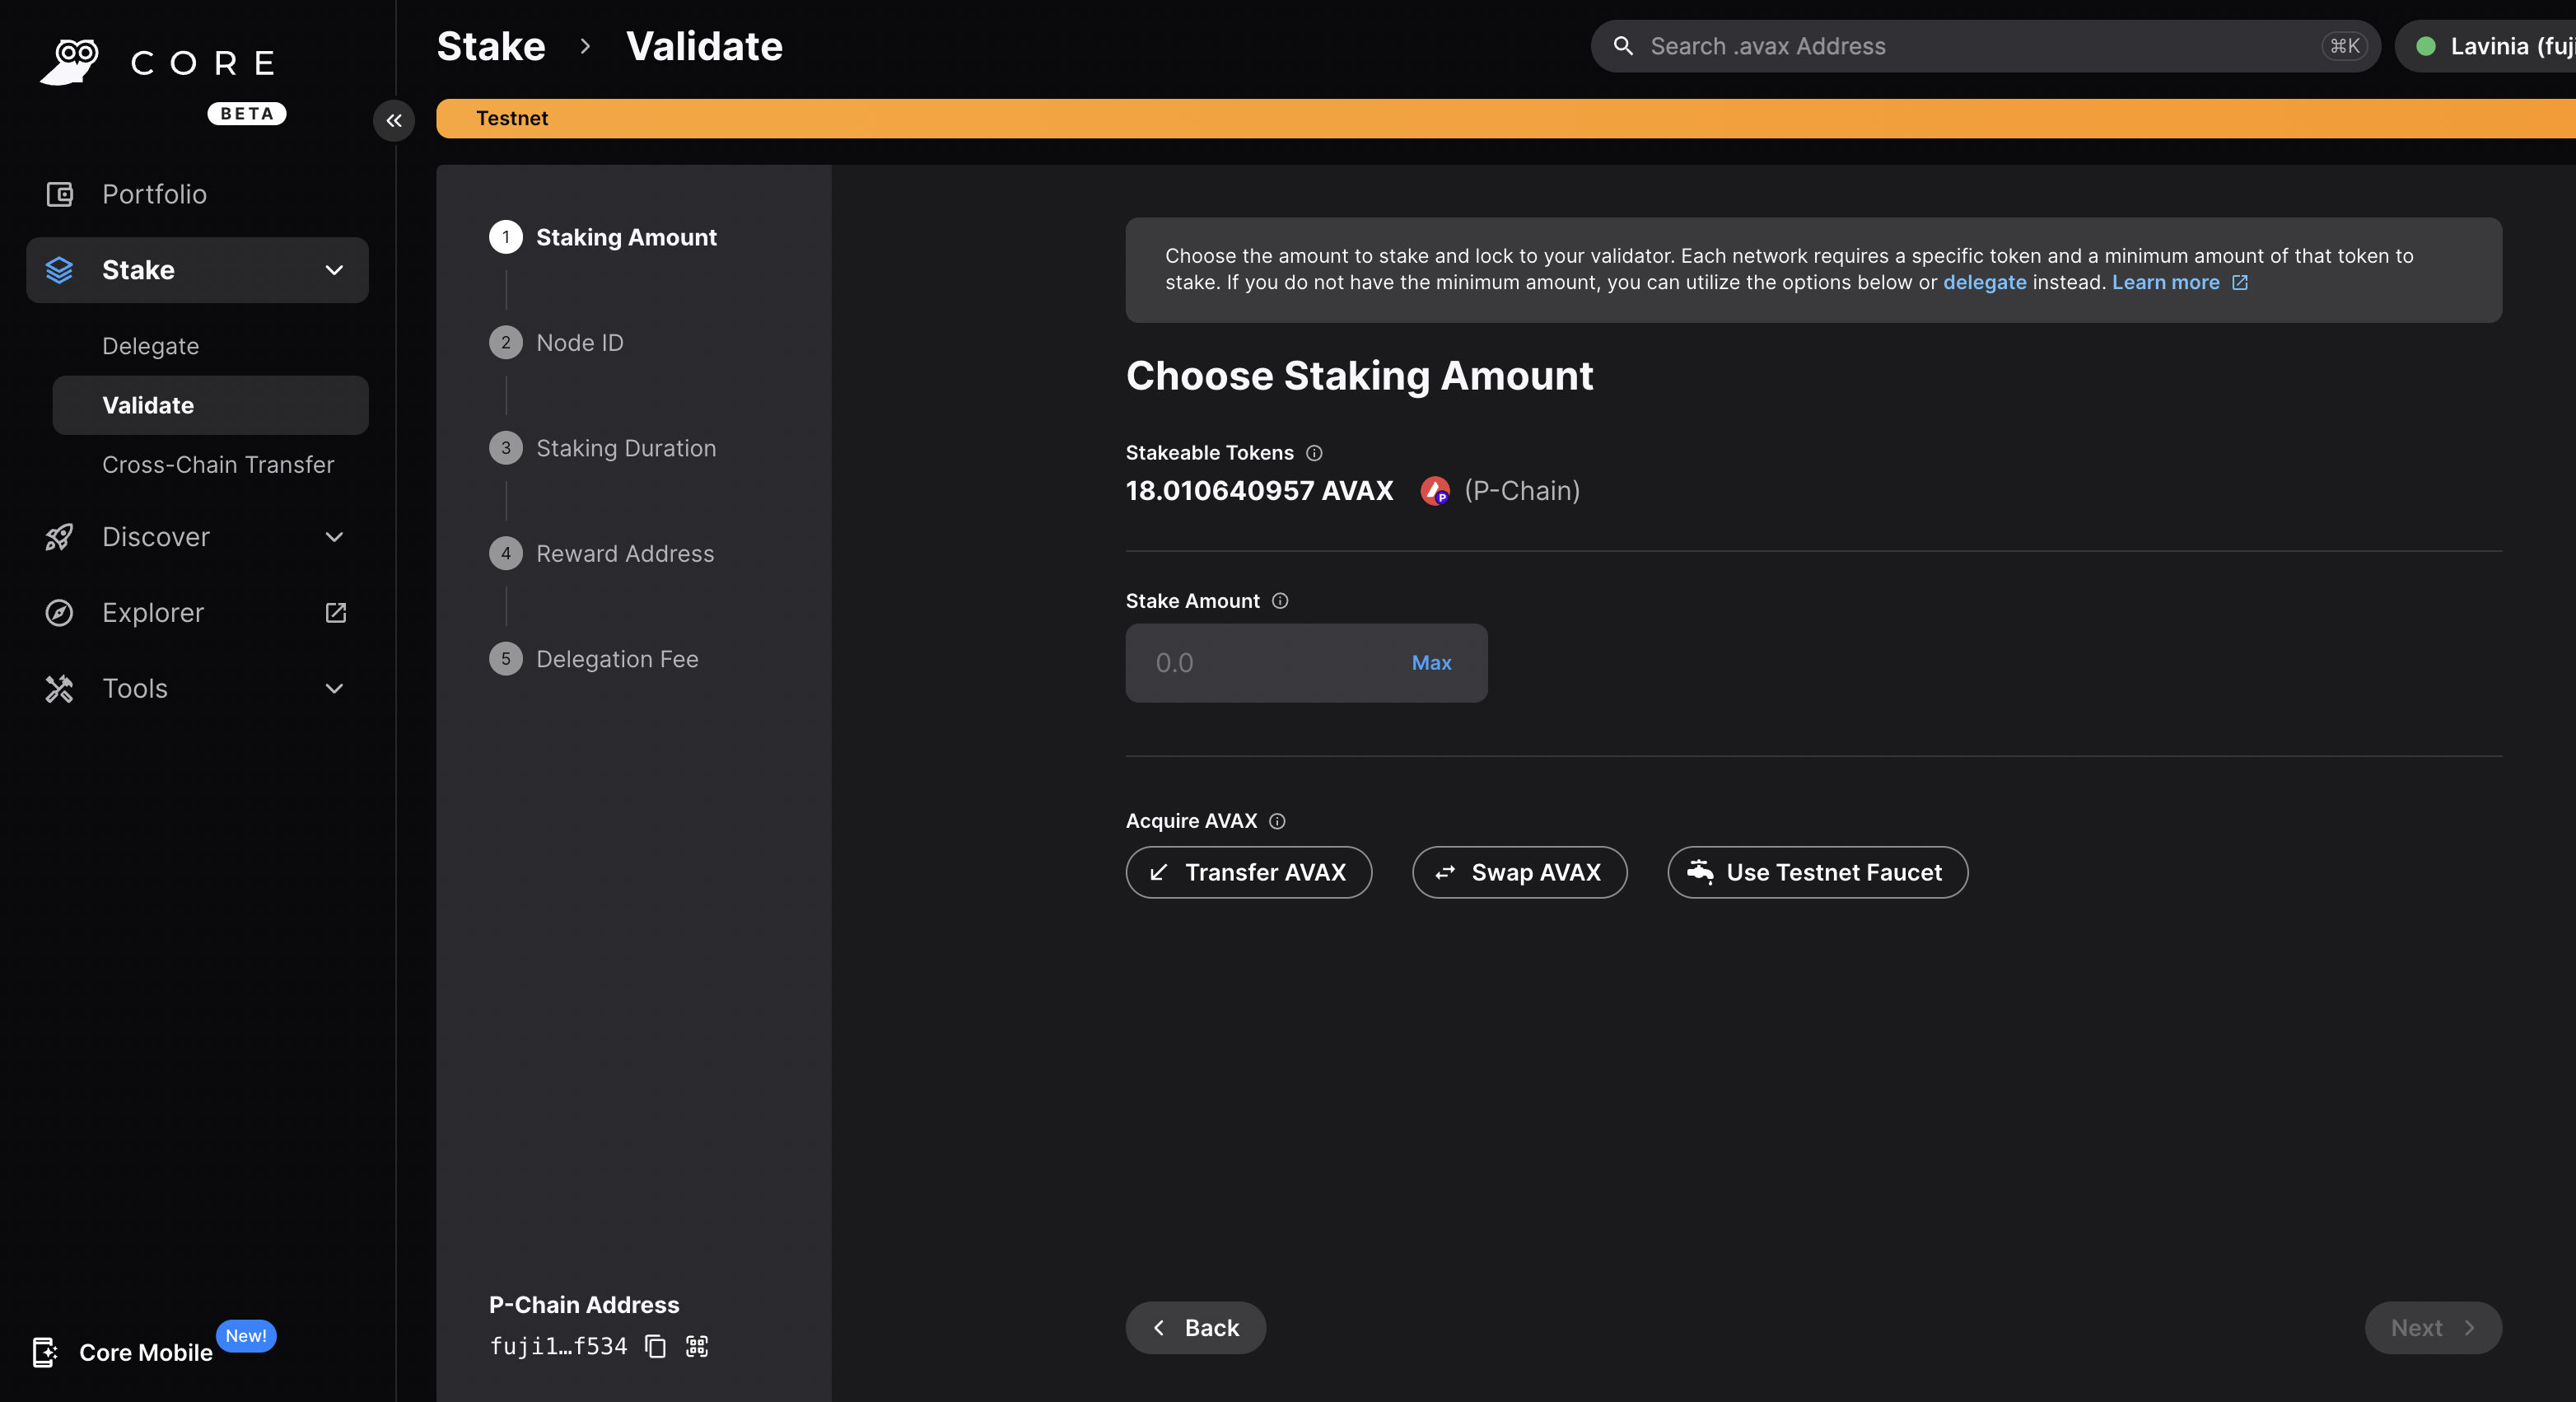
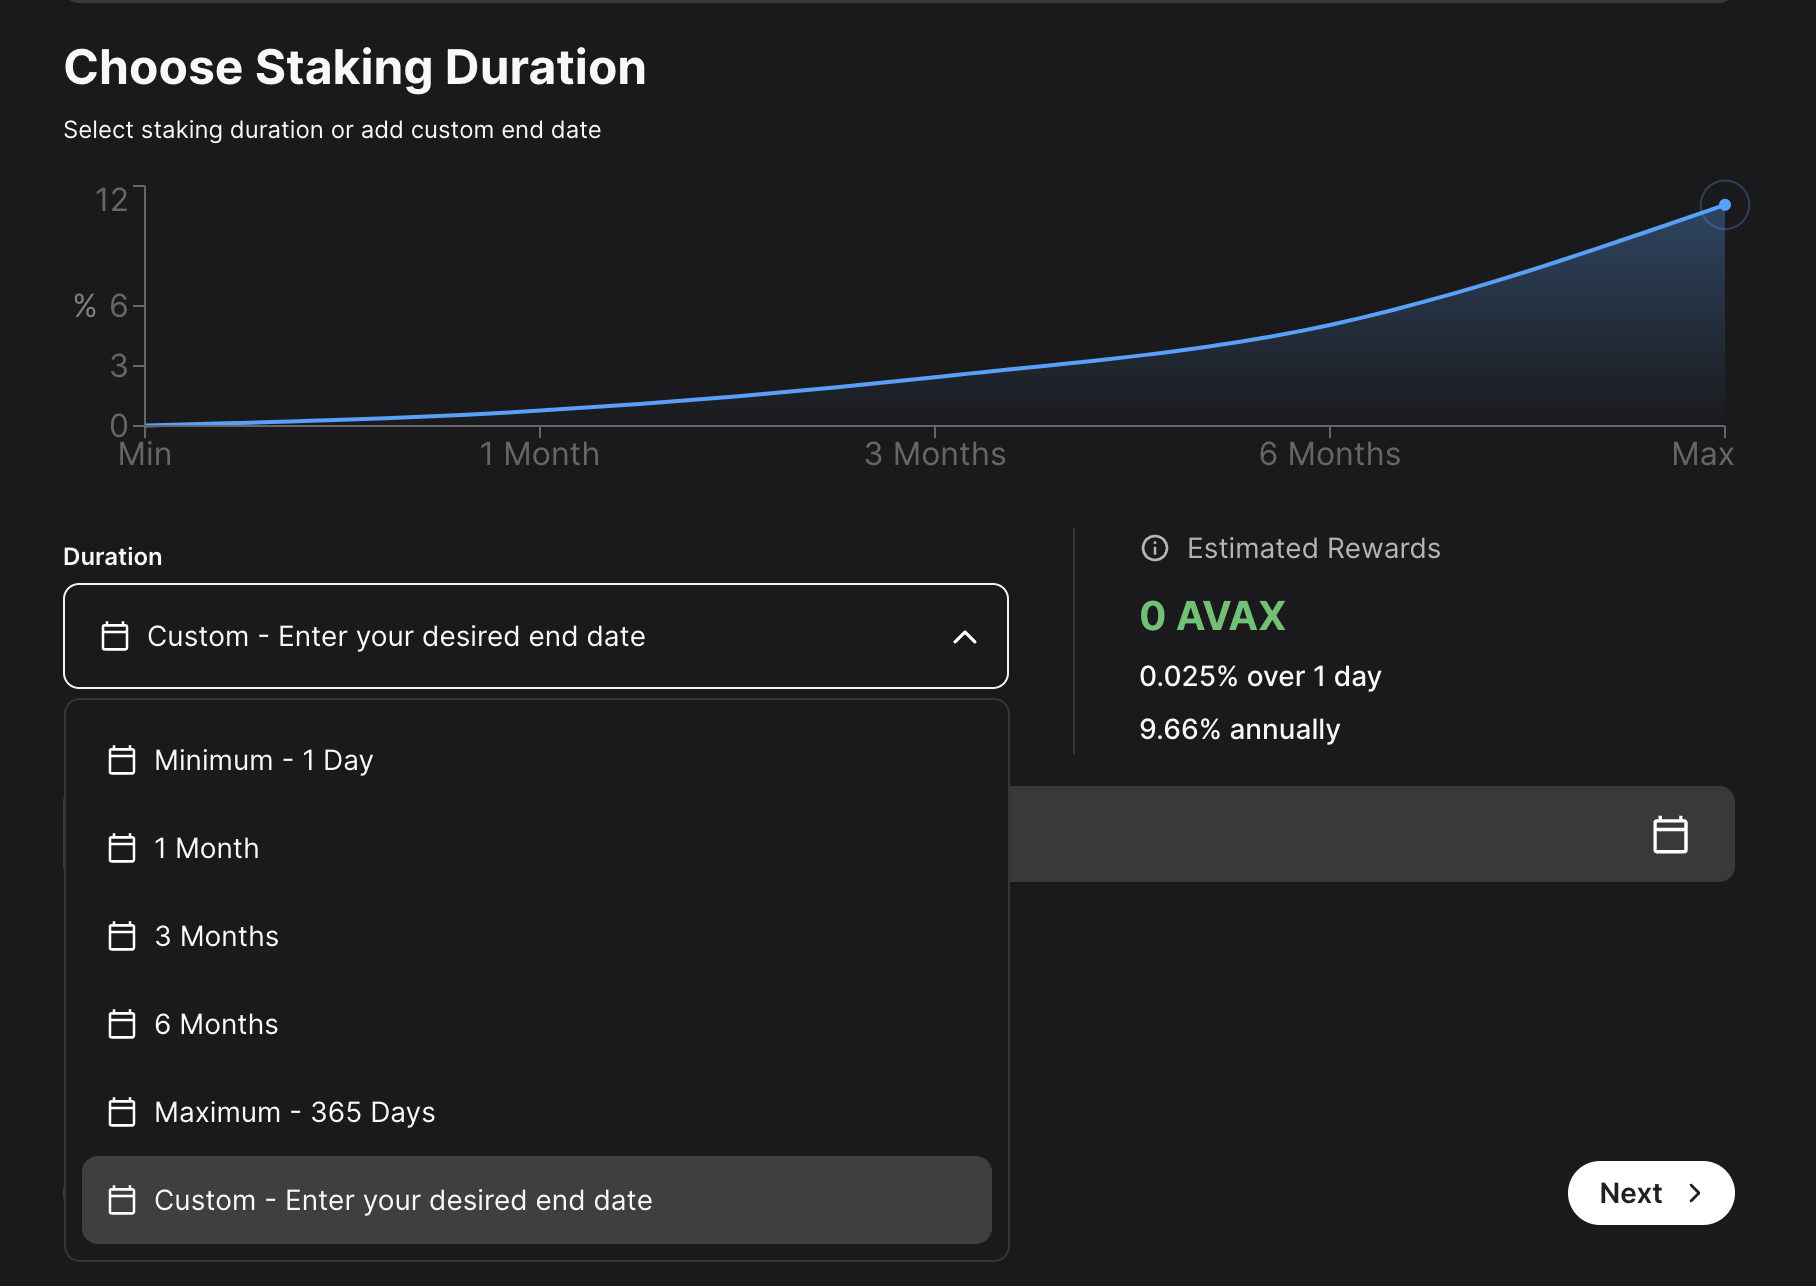
Choose the desired Staking Amount, then click Next.
Enter you Node ID, then click Next.
Here, you'll need to choose the staking duration. There are predefined values, like 1 day, 1 month and so on. You can also choose a custom period of time. For this example, 22 days were chosen.
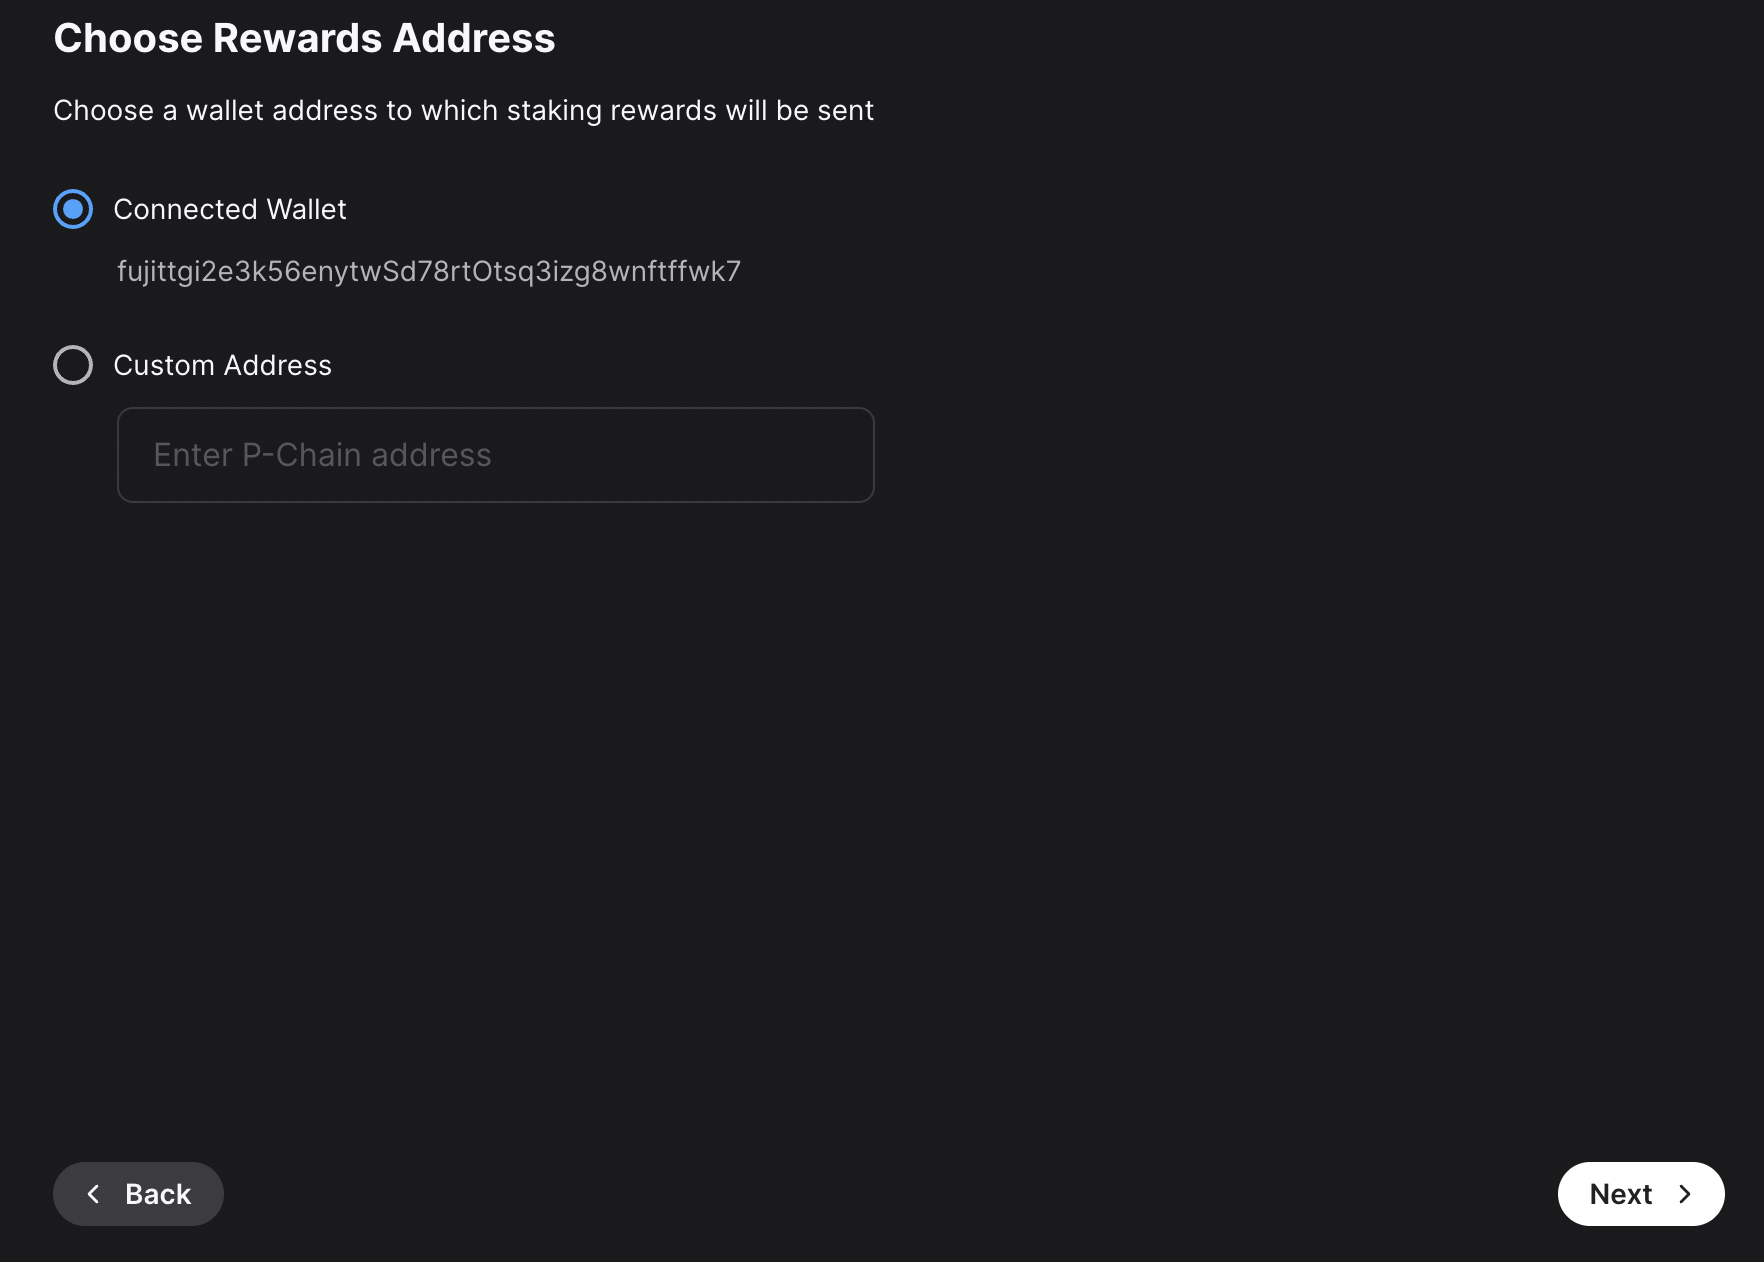
Choose the address that the network will send rewards to. Make sure it's the correct address because once the transaction is submitted this cannot be changed later or undone. You can choose the wallet's P-Chain address, or a custom P-Chain address. After entering the address, click Next.
Other individuals can stake to your validator and receive rewards too, known as "delegating." You will claim this percent of the rewards from the delegators on your node. Click Next.

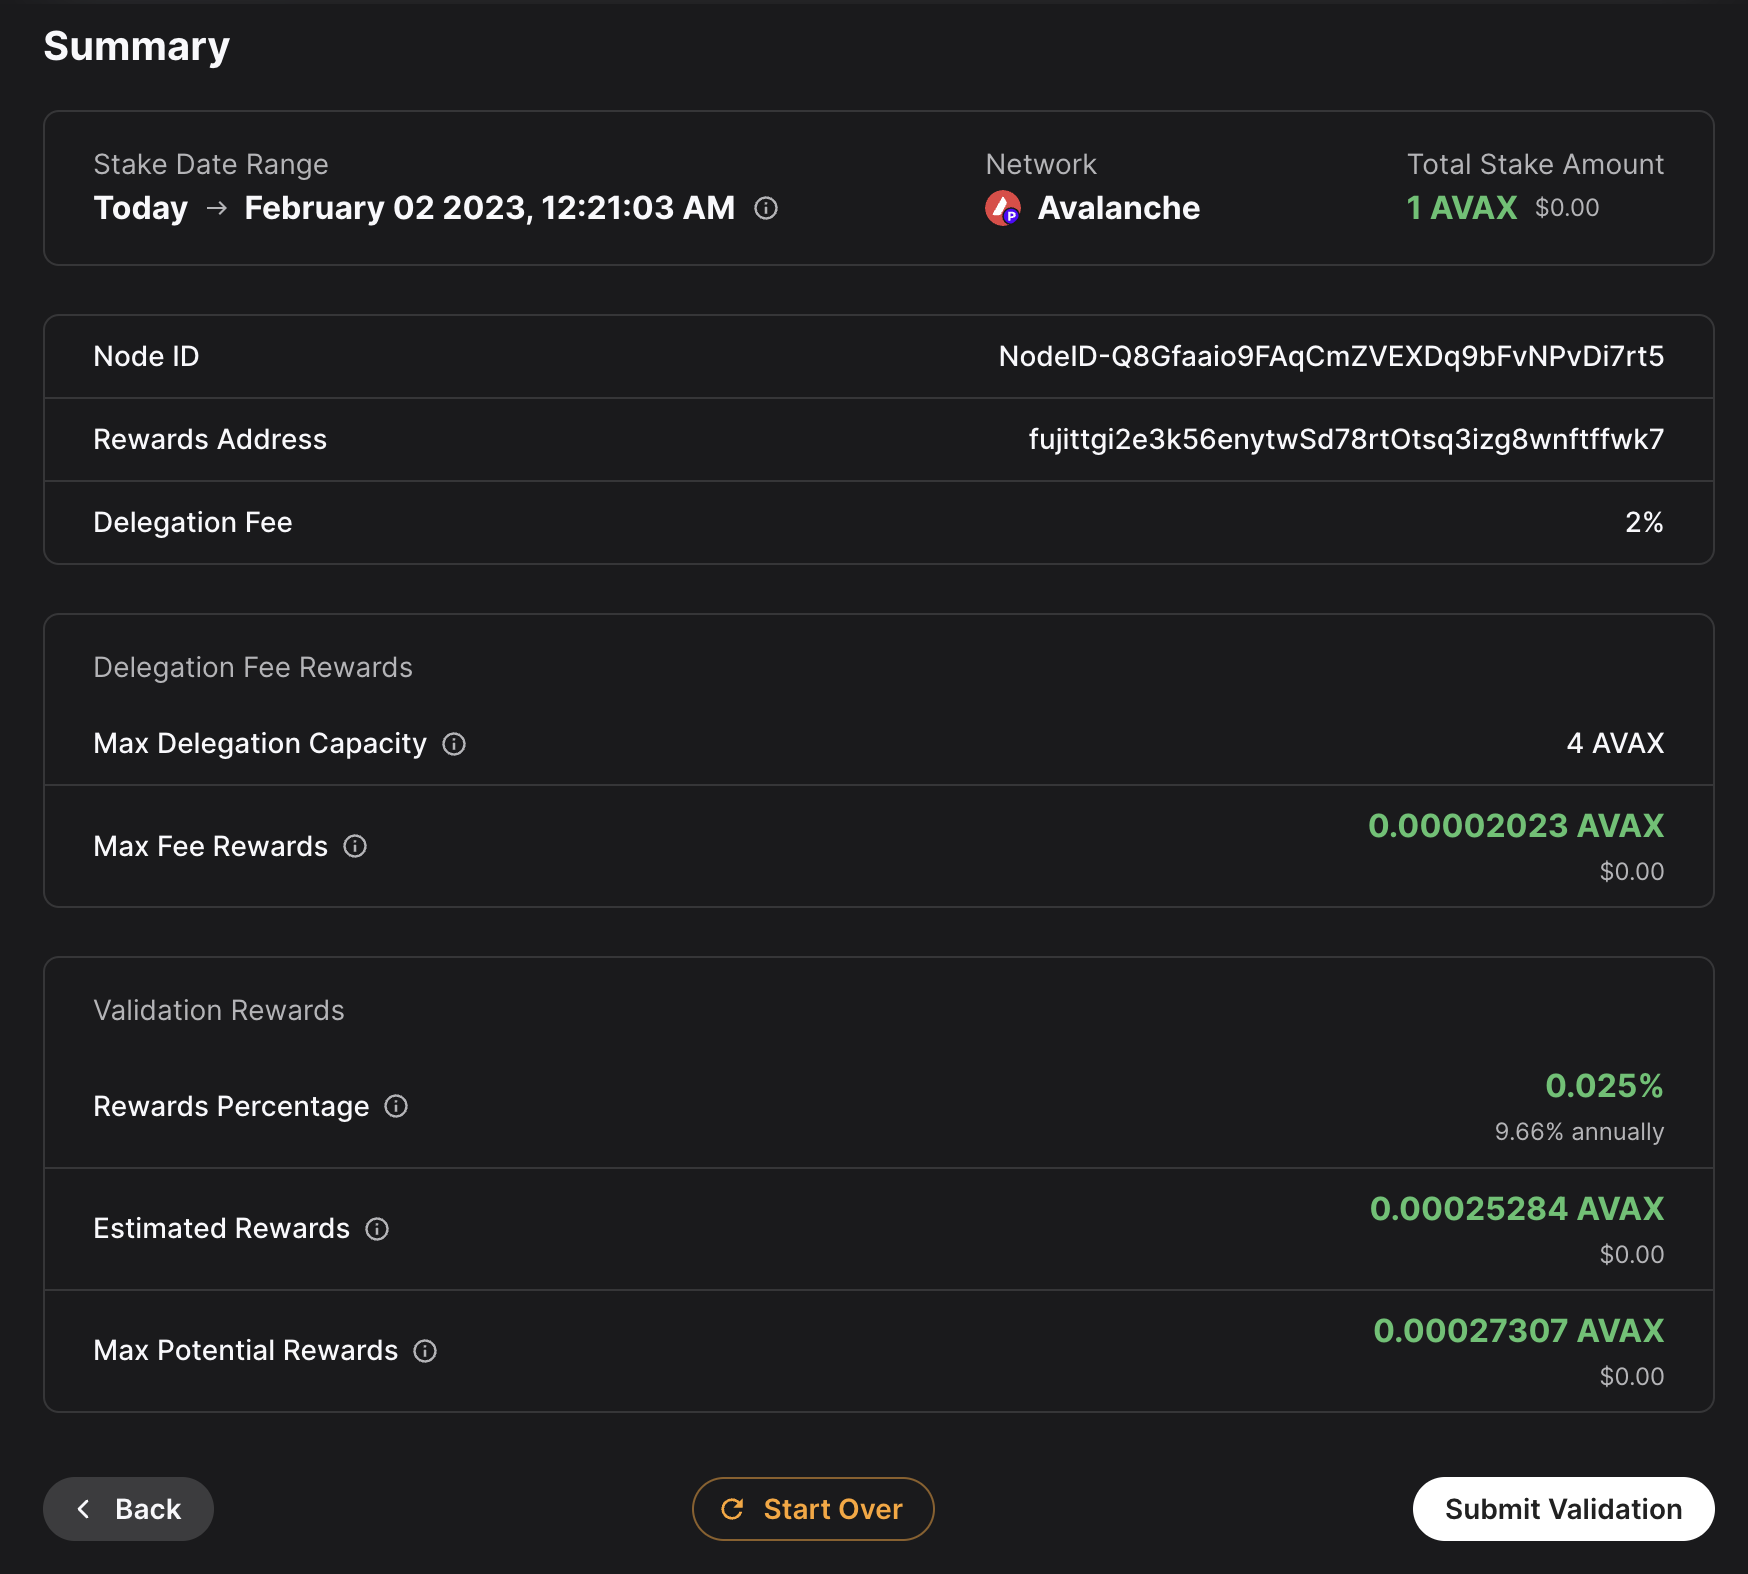
After entering all these details, a summary of your validation will show up. If everything is correct, you can proceed and click on Submit Validation. A new page will open up, prompting you to accept the transaction. Here, please approve the transaction.
After the transaction is approved, you will see a message saying that your validation transaction was submitted.
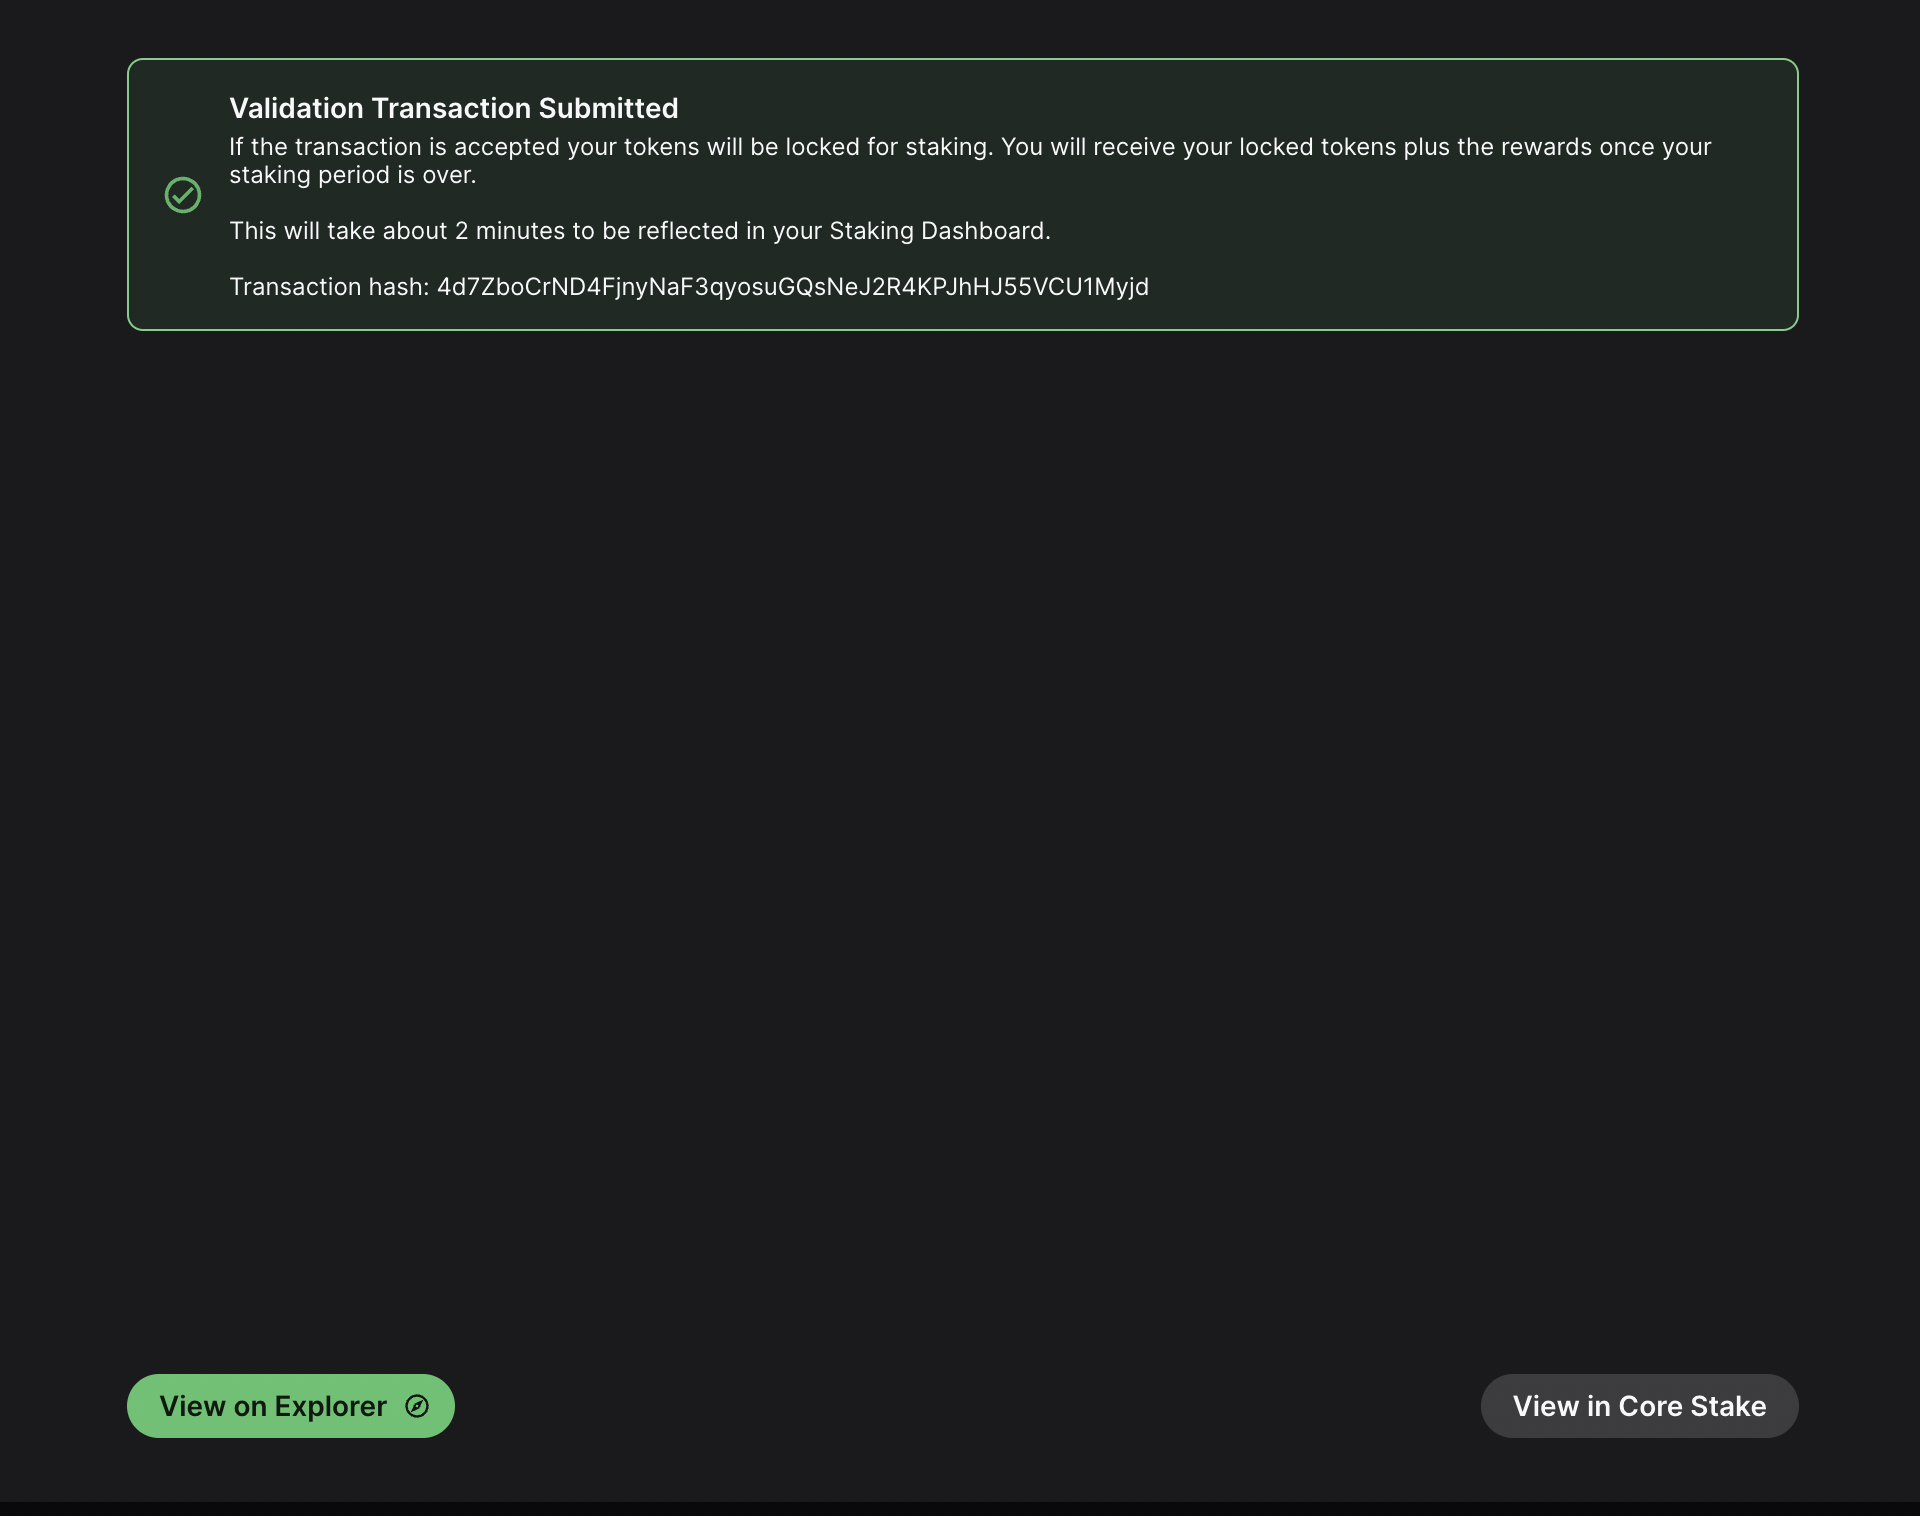
If you click on View on explorer, a new browser tab will open with the details of the
AddValidatorTx. It will show details such as the total value of AVAX transferred, any
AVAX which were burned, the blockchainID, the blockID, the NodeID of the validator,
and the total time which has elapsed from the entire Validation period.
Confirm That the Node is a Pending Validator on Fuji
As a last step you can call the platform.getPendingvalidators endpoint to
confirm that the Avalanche node which was recently spun up on AWS is no in the
pending validators queue where it will stay for 5 minutes.
platform.getPendingValidators Request
curl --location --request POST 'https://api.avax-test.network/ext/bc/P' \
--header 'Content-Type: application/json' \
--data-raw '{
    "jsonrpc": "2.0",
    "method": "platform.getPendingValidators",
    "params": {
        "subnetID": "11111111111111111111111111111111LpoYY",
        "nodeIDs": []
    },
    "id": 1
}'
platform.getPendingValidators Response
{
  "jsonrpc": "2.0",
  "result": {
    "validators": [
      {
        "txID": "4d7ZboCrND4FjnyNaF3qyosuGQsNeJ2R4KPJhHJ55VCU1Myjd",
        "startTime": "1673411918",
        "endTime": "1675313170",
        "stakeAmount": "1000000000",
        "nodeID": "NodeID-Q8Gfaaio9FAqCmZVEXDq9bFvNPvDi7rt5",
        "delegationFee": "2.0000",
        "connected": false,
        "delegators": null
      }
    ],
    "delegators": []
  },
  "id": 1
}
You can also pass in the NodeID as a string to the nodeIDs array in the request body.
curl --location --request POST 'https://api.avax-test.network/ext/bc/P' \
--header 'Content-Type: application/json' \
--data-raw '{
    "jsonrpc": "2.0",
    "method": "platform.getPendingValidators",
    "params": {
        "subnetID": "11111111111111111111111111111111LpoYY",
        "nodeIDs": ["NodeID-Q8Gfaaio9FAqCmZVEXDq9bFvNPvDi7rt5"]
    },
    "id": 1
}'
This will filter the response by the nodeIDs array which will save you time by
no longer requiring you to search through the entire response body for the
NodeIDs.
{
  "jsonrpc": "2.0",
  "result": {
    "validators": [
      {
        "txID": "4d7ZboCrND4FjnyNaF3qyosuGQsNeJ2R4KPJhHJ55VCU1Myjd",
        "startTime": "1673411918",
        "endTime": "1675313170",
        "stakeAmount": "1000000000",
        "nodeID": "NodeID-Q8Gfaaio9FAqCmZVEXDq9bFvNPvDi7rt5",
        "delegationFee": "2.0000",
        "connected": false,
        "delegators": null
      }
    ],
    "delegators": []
  },
  "id": 1
}
After 5 minutes the node will officially start validating the Avalanche Fuji
testnet and you will no longer see it in the response body for the
platform.getPendingValidators endpoint. Now you will access it via the
platform.getCurrentValidators endpoint.
platform.getCurrentValidators Request
curl --location --request POST 'https://api.avax-test.network/ext/bc/P' \
--header 'Content-Type: application/json' \
--data-raw '{
    "jsonrpc": "2.0",
    "method": "platform.getCurrentValidators",
    "params": {
        "subnetID": "11111111111111111111111111111111LpoYY",
        "nodeIDs": ["NodeID-Q8Gfaaio9FAqCmZVEXDq9bFvNPvDi7rt5"]
    },
    "id": 1
}'
platform.getCurrentValidators Response
{
  "jsonrpc": "2.0",
  "result": {
    "validators": [
      {
        "txID": "2hy57Z7KiZ8L3w2KonJJE1fs5j4JDzVHLjEALAHaXPr6VMeDhk",
        "startTime": "1673411918",
        "endTime": "1675313170",
        "stakeAmount": "1000000000",
        "nodeID": "NodeID-Q8Gfaaio9FAqCmZVEXDq9bFvNPvDi7rt5",
        "rewardOwner": {
          "locktime": "0",
          "threshold": "1",
          "addresses": [
            "P-fuji1tgj2c3k56enytw5d78rt0tsq3lzg8wnftffwk7"
          ]
        },
        "validationRewardOwner": {
          "locktime": "0",
          "threshold": "1",
          "addresses": [
            "P-fuji1tgj2c3k56enytw5d78rt0tsq3lzg8wnftffwk7"
          ]
        },
        "delegationRewardOwner": {
          "locktime": "0",
          "threshold": "1",
          "addresses": [
            "P-fuji1tgj2c3k56enytw5d78rt0tsq3lzg8wnftffwk7"
          ]
        },
        "potentialReward": "5400963",
        "delegationFee": "2.0000",
        "uptime": "0.0000",
        "connected": false,
        "delegators": null
      }
    ]
  },
  "id": 1
}
Mainnet
All of these steps can be applied to Mainnet. However, the minimum required Avax token amounts to become a validator is 2,000 on the Mainnet. For more information, please read this doc.
Maintenance
AWS one click is meant to be used in automated environments, not as an end-user solution. You can still manage it manually, but it is not as easy as an Ubuntu instance or using the script:
- AvalancheGo binary is at
/usr/local/bin/avalanchego - Main node config is at
/etc/avalanchego/conf.json - Working directory is at
/home/avalanche/.avalanchego/ (and belongs to avalanchego user) - Database is at
/data/avalanchego - Logs are at
/var/log/avalanchego
For a simple upgrade you would need to place the new binary at /usr/local/bin/.
If you run a Subnet, you would also need to place the VM binary into /home/avalanche/.avalanchego/plugins.
You can also look at using this guide, but that won't address updating the Subnet, if you have one.
Summary
Avalanche is the first decentralized smart contracts platform built for the scale of global finance, with near-instant transaction finality. Now with an Avalanche Validator node available as a one-click install from the AWS Marketplace developers and entrepreneurs can on-ramp into the Avalanche ecosystem in a matter of minutes. If you have any questions or want to follow up in any way please join our Discord server at https://chat.avax.network. For more developer resources please check out our Developer Documentation.
Was this page helpful?