Run an Avalanche Node with Amazon Web Services (AWS)
Introduction
This tutorial will guide you through setting up an Avalanche node on Amazon Web Services (AWS). Cloud services like AWS are a good way to ensure that your node is highly secure, available, and accessible.
To get started, you'll need:
- An AWS account
- A terminal with which to SSH into your AWS machine
- A place to securely store and back up files
This tutorial assumes your local machine has a Unix style terminal. If you're on Windows, you'll have to adapt some of the commands used here.
Log Into AWS
Signing up for AWS is outside the scope of this article, but Amazon has instructions here.
It is highly recommended that you set up Multi-Factor Authentication on your AWS root user account to protect it. Amazon has documentation for this here.
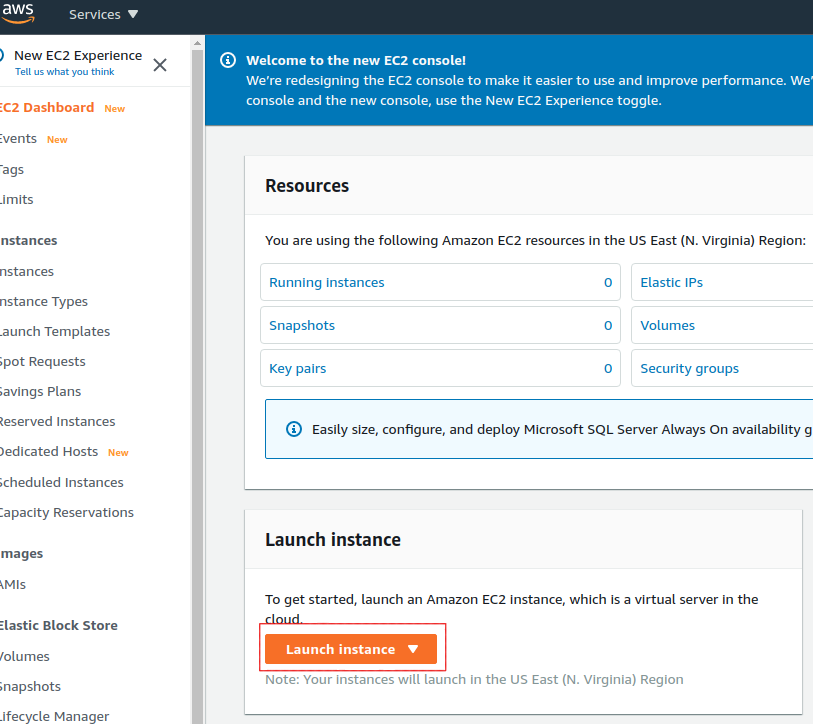
Once your account is set up, you should create a new EC2 instance. An EC2 is a virtual machine instance in AWS's cloud. Go to the AWS Management Console and enter the EC2 dashboard.
-6ae235b2dea3f67c195006ad23bfe6cf.png)
To log into the EC2 instance, you will need a key on your local machine that grants access to the instance. First, create that key so that it can be assigned to the EC2 instance later on. On the bar on the left side, under Network & Security, select Key Pairs.
-79b12d561c69e6906aa93d5e3f547dad.png)
Select Create key pair to launch the key pair creation wizard.

Name your key avalanche. If your local machine has MacOS or Linux, select the
pem file format. If it's Windows, use the ppk file format. Optionally, you
can add tags for the key pair to assist with tracking.

Click Create key pair. You should see a success message, and the key file
should be downloaded to your local machine. Without this file, you will not be
able to access your EC2 instance. Make a copy of this file and put it on a
separate storage medium such as an external hard drive. Keep this file secret;
do not share it with others.

Create a Security Group
An AWS Security Group defines what internet traffic can enter and leave your EC2 instance. Think of it like a firewall. Create a new Security Group by selecting Security Groups under the Network & Security drop-down.

This opens the Security Groups panel. Click Create security group in the top right of the Security Groups panel.

You'll need to specify what inbound traffic is allowed. Allow SSH traffic from your IP address so that you can log into your EC2 instance (each time your ISP changes your IP address, you will need to modify this rule). Allow TCP traffic on port 9651 so your node can communicate with other nodes on the network. Allow TCP traffic on port 9650 from your IP so you can make API calls to your node. It's important that you only allow traffic on the SSH and API port from your IP. If you allow incoming traffic from anywhere, this could be used to brute force entry to your node (SSH port) or used as a denial of service attack vector (API port). Finally, allow all outbound traffic.
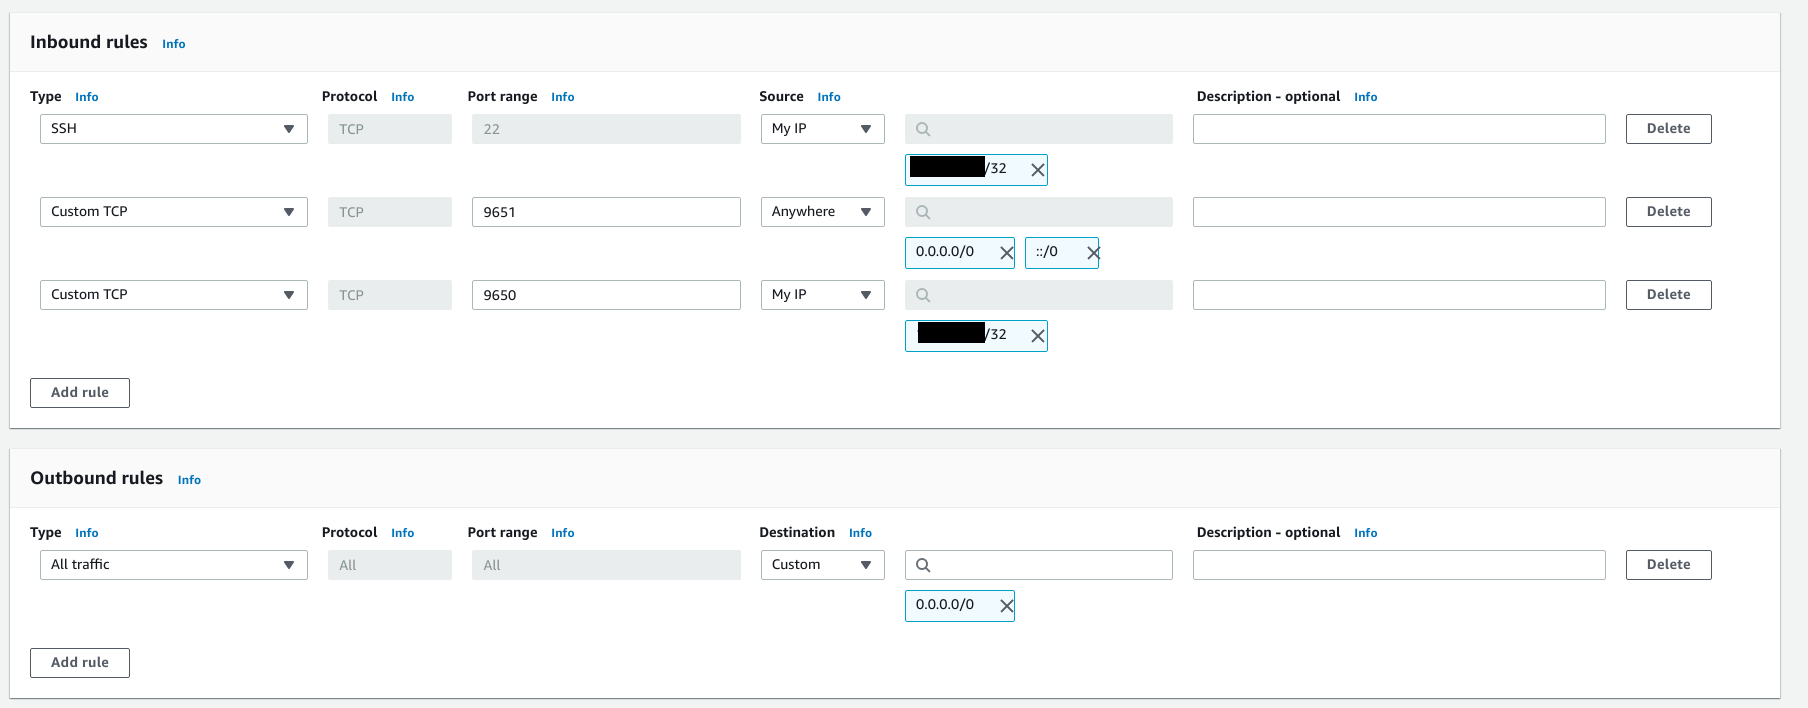
Add a tag to the new security group with key Name and valueAvalanche Security Group. This will enable us to know what this security group is when we see it
in the list of security groups.

Click Create security group. You should see the new security group in the list of security groups.
Launch an EC2 Instance
Now you're ready to launch an EC2 instance. Go to the EC2 Dashboard and select Launch instance.
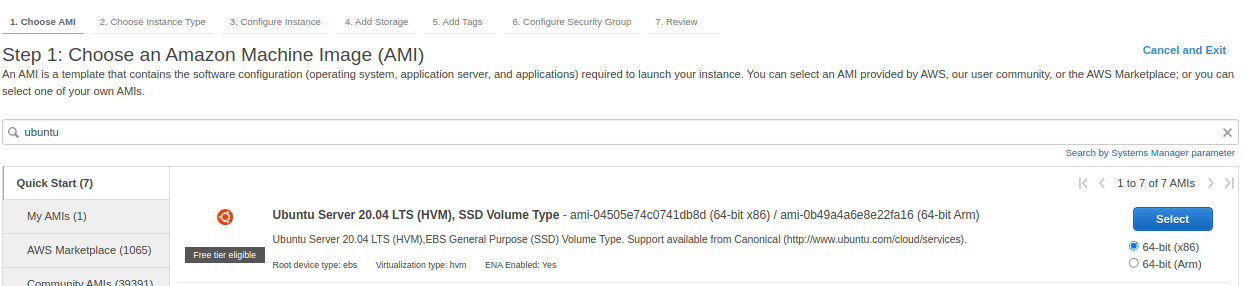
Select Ubuntu 20.04 LTS (HVM), SSD Volume Type for the operating system.
Next, choose your instance type. This defines the hardware specifications of the cloud instance. In this tutorial we set up a c5.2xlarge. This should be more than powerful enough since Avalanche is a lightweight consensus protocol. To create a c5.2xlarge instance, select the Compute-optimized option from the filter drop-down menu.
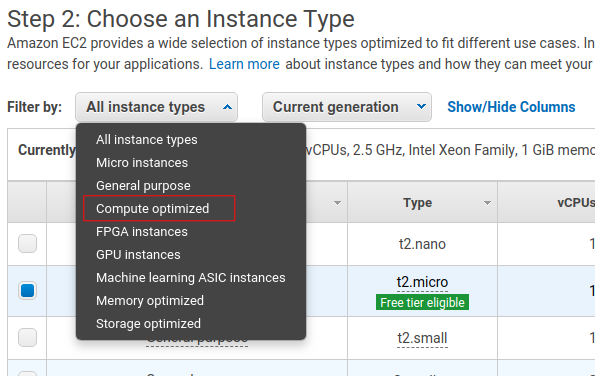
Select the checkbox next to the c5.2xlarge instance in the table.

Click the Next: Configure Instance Details button in the bottom right-hand corner.

The instance details can stay as their defaults.
When setting up a node as a validator, it is crucial to select the appropriate AWS instance type to ensure the node can efficiently process transactions and manage the network load. The recommended instance types are as follows:
- For a minimal stake, start with a compute-optimized instance such as c6, c6i, c6a, c7 and similar.
- Use a 2xlarge instance size for the minimal stake configuration.
- As the staked amount increases, choose larger instance sizes to accommodate the additional workload. For every order of magnitude increase in stake, move up one instance size. For example, for a 20k AVAX stake, a 4xlarge instance is suitable.
Optional: Using Reserved Instances
By default, you will be charged hourly for running your EC2 instance. For a long term usage that is not optimal.
You could save money by using a Reserved Instance. With a reserved instance, you pay upfront for an entire year of EC2 usage, and receive a lower per-hour rate in exchange for locking in. If you intend to run a node for a long time and don't want to risk service interruptions, this is a good option to save money. Again, do your own research before selecting this option.
Add Storage, Tags, Security Group
Click the Next: Add Storage button in the bottom right corner of the screen.
You need to add space to your instance's disk. You should start with at least 700GB of disk space. Although upgrades to reduce disk usage are always in development, on average the database will continually grow, so you need to constantly monitor disk usage on the node and increase disk space if needed.
Note that the image below shows 100GB as disk size, which was appropriate at the time the screenshot was taken. You should check the current recommended disk space size before entering the actual value here.

Click Next: Add Tags in the bottom right corner of the screen to add tags to
the instance. Tags enable us to associate metadata with our instance. Add a tag
with key Name and value My Avalanche Node. This will make it clear what this
instance is on your list of EC2 instances.

Now assign the security group created earlier to the instance. Choose Select an existing security group and choose the security group created earlier.

Finally, click Review and Launch in the bottom right. A review page will show the details of the instance you're about to launch. Review those, and if all looks good, click the blue Launch button in the bottom right corner of the screen.
You'll be asked to select a key pair for this instance. Select Choose an
existing key pair and then select the avalanche key pair you made earlier in
the tutorial. Check the box acknowledging that you have access to the .pem or
.ppk file created earlier (make sure you've backed it up!) and then click
Launch Instances.

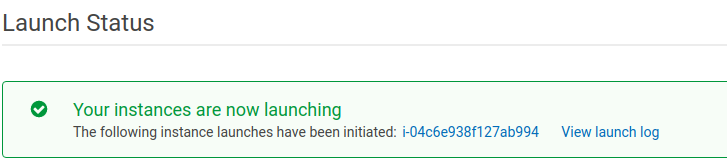
You should see a new pop up that confirms the instance is launching!
Assign an Elastic IP
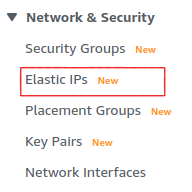
By default, your instance will not have a fixed IP. Let's give it a fixed IP through AWS's Elastic IP service. Go back to the EC2 dashboard. Under Network & Security, select Elastic IPs.
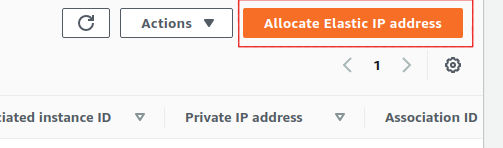
Select Allocate Elastic IP address.
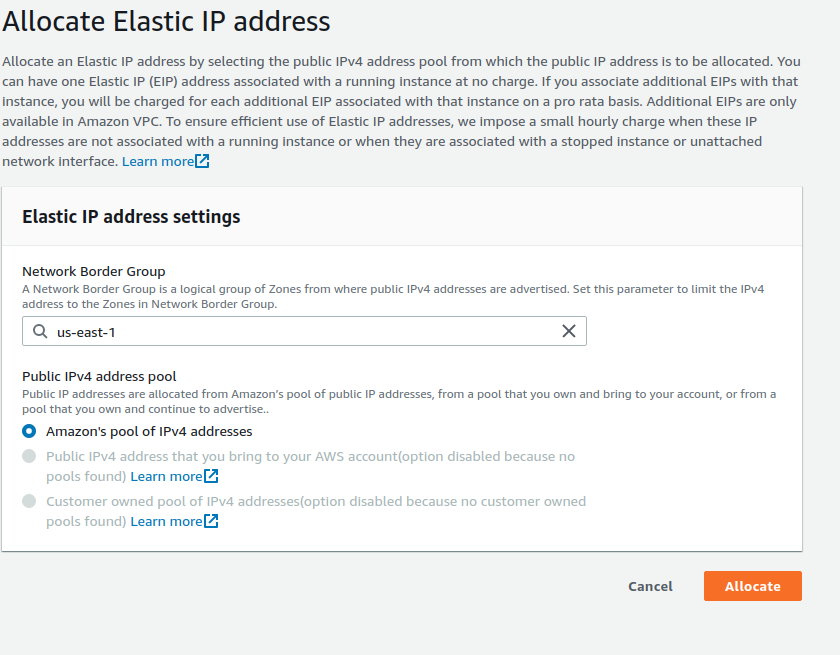
Select the region your instance is running in, and choose to use Amazon’s pool of IPv4 addresses. Click Allocate.
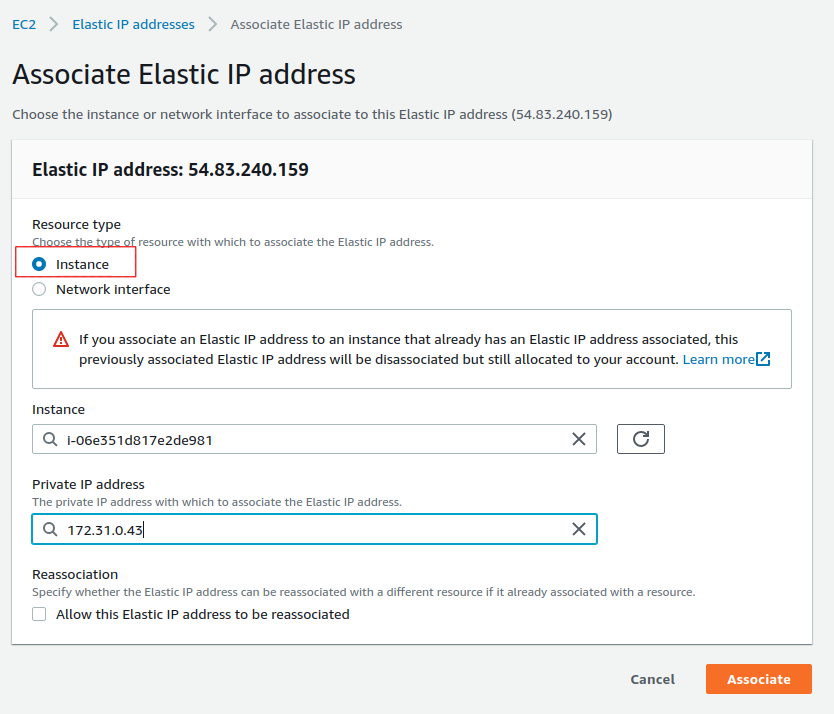
Select the Elastic IP you just created from the Elastic IP manager. From the Actions drop-down, choose Associate Elastic IP address.

Select the instance you just created. This will associate the new Elastic IP with the instance and give it a public IP address that won't change.
Set Up AvalancheGo
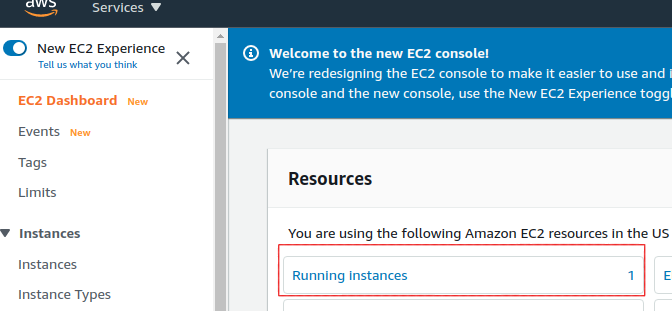
Go back to the EC2 Dashboard and select Running Instances.
Select the newly created EC2 instance. This opens a details panel with information about the instance.
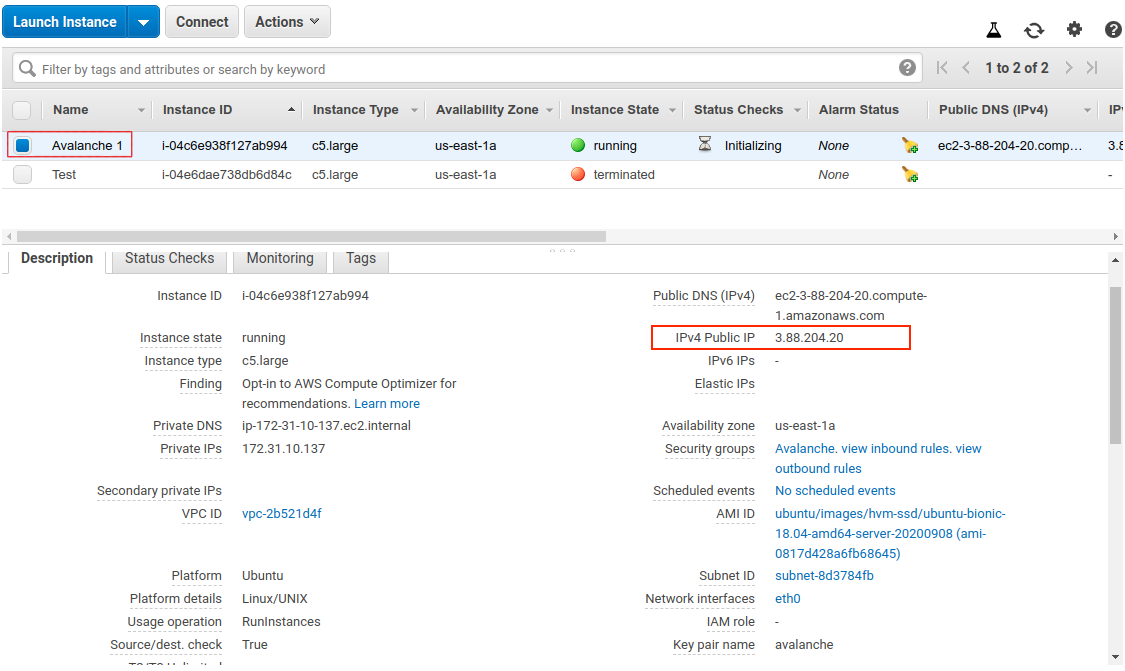
Copy the IPv4 Public IP field to use later. From now on we call this value PUBLICIP.
Remember: the terminal commands below assume you're running Linux. Commands may differ for MacOS or other operating systems. When copy-pasting a command from a code block, copy and paste the entirety of the text in the block.
Log into the AWS instance from your local machine. Open a terminal (try shortcut
CTRL + ALT + T) and navigate to the directory containing the .pem file you
downloaded earlier.
Move the .pem file to $HOME/.ssh (where .pem files generally live) with:
mv avalanche.pem ~/.ssh
Add it to the SSH agent so that we can use it to SSH into your EC2 instance, and mark it as read-only.
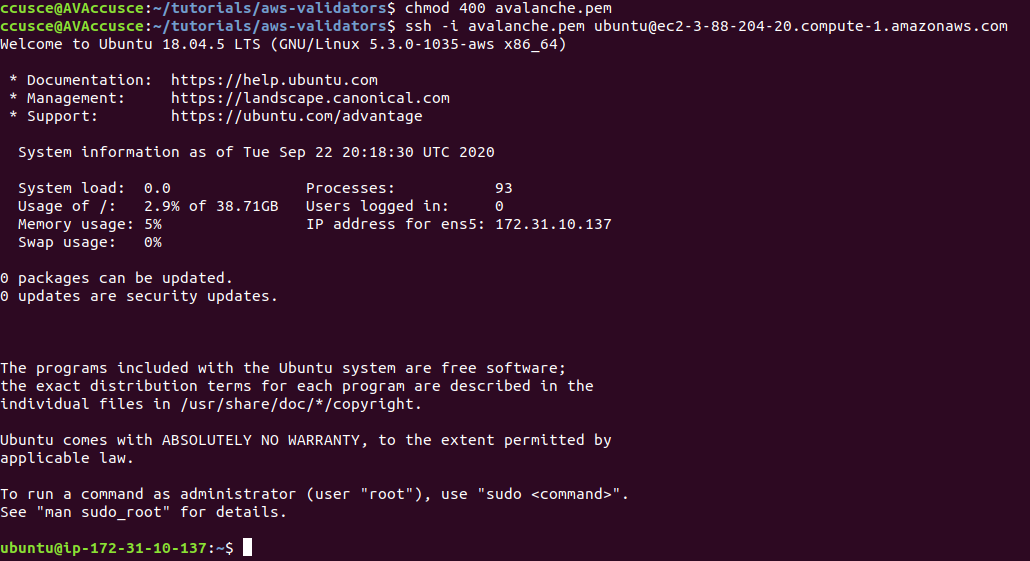
ssh-add ~/.ssh/avalanche.pem; chmod 400 ~/.ssh/avalanche.pem
SSH into the instance. (Remember to replace PUBLICIP with the public IP field from earlier.)
ssh ubuntu@PUBLICIP
If the permissions are not set correctly, you will see the following error.

You are now logged into the EC2 instance.
If you have not already done so, update the instance to make sure it has the latest operating system and security updates:
sudo apt update; sudo apt upgrade -y; sudo reboot
This also reboots the instance. Wait 5 minutes, then log in again by running this command on your local machine:
ssh ubuntu@PUBLICIP
You're logged into the EC2 instance again. Now we’ll need to set up our
Avalanche node. To do this, follow the Set Up Avalanche Node With Installer tutorial
which automates the installation process. You will need the PUBLICIP
we set up earlier.
Your AvalancheGo node should now be running and in the process of bootstrapping,
which can take a few hours. To check if it's done, you can issue an API call
using curl. If you're making the request from the EC2 instance, the request
is:
curl -X POST --data '{
    "jsonrpc":"2.0",
    "id"     :1,
    "method" :"info.isBootstrapped",
    "params": {
        "chain":"X"
    }
}' -H 'content-type:application/json;' 127.0.0.1:9650/ext/info
Once the node is finished bootstrapping, the response will be:
{
    "jsonrpc": "2.0",
    "result": {
        "isBootstrapped": true
    },
    "id": 1
}
You can continue on, even if AvalancheGo isn't done bootstrapping.
In order to make your node a validator, you'll need its node ID. To get it, run:
curl -X POST --data '{
    "jsonrpc":"2.0",
    "id"     :1,
    "method" :"info.getNodeID"
}' -H 'content-type:application/json;' 127.0.0.1:9650/ext/info
The response contains the node ID.
{"jsonrpc":"2.0","result":{"nodeID":"NodeID-DznHmm3o7RkmpLkWMn9NqafH66mqunXbM"},"id":1}
In the above example the node ID isNodeID-DznHmm3o7RkmpLkWMn9NqafH66mqunXbM.
Copy your node ID for later. Your node ID is not a secret, so you can just paste
it into a text editor.
AvalancheGo has other APIs, such as the Health API, that may be used to interact with
the node. Some APIs are disabled by default. To enable such APIs, modify the
ExecStart section of /etc/systemd/system/avalanchego.service (created during
the installation process) to include flags that enable these endpoints. Don't
manually enable any APIs unless you have a reason to.

Back up the node's staking key and certificate in case the EC2 instance is
corrupted or otherwise unavailable. The node's ID is derived from its staking
key and certificate. If you lose your staking key or certificate then your node
will get a new node ID, which could cause you to become ineligible for a staking
reward if your node is a validator. It is very strongly advised that you copy
your node's staking key and certificate. The first time you run a node, it
will generate a new staking key/certificate pair and store them in directory
/home/ubuntu/.avalanchego/staking.
Exit out of the SSH instance by running:
exit
Now you're no longer connected to the EC2 instance; you're back on your local machine.
To copy the staking key and certificate to your machine, run the following
command. As always, replace PUBLICIP.
scp -r ubuntu@PUBLICIP:/home/ubuntu/.avalanchego/staking ~/aws_avalanche_backup
Now your staking key and certificate are in directory ~/aws_avalanche_backup .
The contents of this directory are secret. You should hold this directory on
storage not connected to the internet (like an external hard drive.)
Upgrading Your Node
AvalancheGo is an ongoing project and there are regular version upgrades. Most upgrades are recommended but not required. Advance notice will be given for upgrades that are not backwards compatible. To update your node to the latest version, SSH into your AWS instance as before and run the installer script again.
./avalanchego-installer.sh
Your machine is now running the newest AvalancheGo version. To see the status of
the AvalancheGo service, run sudo systemctl status avalanchego.
Increase Volume Size
If you need to increase the volume size, follow these instructions from AWS:
Wrap Up
That's it! You now have an AvalancheGo node running on an AWS EC2 instance. We recommend setting up node monitoringfor your AvalancheGo node. We also recommend setting up AWS billing alerts so you're not surprised when the bill arrives. If you have feedback on this tutorial, or anything else, send us a message on Discord.
Was this page helpful?