Enable Testnet Capabilities on a Subnet with Avalanche Subnet Faucet
There are thousands of networks and chains in the blockchain space, each with its capabilities and use-cases. Each network requires native coins to do any transaction on them, which can have a monetary value as well. These coins can be collected through centralized exchanges, token sales, etc in exchange for some monetary assets like USD.
But we cannot risk our funds on the network or on any applications hosted on that network, without testing them first. So, these networks often have test networks or testnets, where the native coins do not have any monetary value, and thus can be obtained freely through faucets.
These testnets are often the testbeds for any new native feature of the network itself, or any dapp or Subnet that is going live on the main network (Mainnet). For example, Fuji network is the Testnet for Avalanche's Mainnet.
Besides Fuji Testnet, the Avalanche Faucet can be used to get free test tokens on testnet Subnets like:
- WAGMI Testnet
- DeFI Kingdoms Testnet
- Beam Testnet and many more.
You can use this repository to deploy your faucet or just make a PR with the configurations of the Subnet. This faucet comes with many features like multiple chain support, custom rate-limiting per Subnet, CAPTCHA verification, and concurrent transaction handling.
Summary
A Faucet powered by Avalanche for Fuji Network and other Subnets. You can -
- Request test coins for the supported Subnets
- Integrate your EVM Subnet with the faucet by making a PR with the chain configurations
- Fork the repository to deploy your faucet for any EVM chain
Adding a New Subnet
You can also integrate a new Subnet on the live faucet with just a few lines of configuration parameters. All you have to do is make a PR on the Avalanche Faucet git repository with the Subnet's information. The following parameters are required.
{
    "ID": string,
    "NAME": string,
    "TOKEN": string,
    "RPC": string,
    "CHAINID": number,
    "EXPLORER": string,
    "IMAGE": string,
    "MAX_PRIORITY_FEE": string,
    "MAX_FEE": string,
    "DRIP_AMOUNT": number,
    "RATELIMIT": {
        "MAX_LIMIT": number,
        "WINDOW_SIZE": number
    }
}
ID- Each Subnet chain should have a unique and relatable ID.NAME- Name of the Subnet chain that will appear on the site.RPC- A valid RPC URL for accessing the chain.CHAINID- ChainID of the chainEXPLORER- Base URL of standard explorer's site.IMAGE- URL of the icon of the chain that will be shown in the dropdown.MAX_PRIORITY_FEE- Maximum tip per faucet drop in wei or 10-18 unit (for EIP1559 supported chains)MAX_FEE- Maximum fee that can be paid for a faucet drop in wei or 10-18 unitDRIP_AMOUNT- Amount of coins to send per request in gwei or 10-9 unitRECALIBRATE(optional) - Number of seconds after which the nonce and balance will recalibrateRATELIMIT- Number of times (MAX_LIMIT) to allow per user within the WINDOW_SIZE (in minutes)
Add the configuration in the array of evmchains inside the
config.json file and make a
PR.
Building and Deploying a Faucet
You can also deploy and build your faucet by using the Avalanche Faucet repository.
Requirements
- Node >= 17.0 and npm >= 8.0
- Google's reCAPTCHA v3 keys
- Docker
Installation
Clone this repository at your preferred location.
git clone https://github.com/ava-labs/avalanche-faucet
The repository cloning method used is HTTPS, but SSH can be used too:
git clone [email protected]:ava-labs/avalanche-faucet.git
You can find more about SSH and how to use it here.
Client-Side Configurations
We need to configure our application with the server API endpoints and CAPTCHA site keys. All the
client-side configurations are there in the client/src/config.json file. Since there are no
secrets on the client-side, we do not need any environment variables. Update the config files
according to your need.
{
  "banner": "/banner.png",
  "apiBaseEndpointProduction": "/api/",
  "apiBaseEndpointDevelopment": "http://localhost:8000/api/",
  "apiTimeout": 10000,
  "CAPTCHA": {
    "siteKey": "6LcNScYfAAAAAJH8fauA-okTZrmAxYqfF9gOmujf",
    "action": "faucetdrip"
  }
}
Put the Google's reCAPTCHA site-key without which the faucet client can't send the necessary CAPTCHA response to the server. This key is not a secret and could be public.
In the above file, there are 2 base endpoints for the faucet server apiBaseEndpointProduction and
apiBaseEndpointDevelopment.
In production mode, the client-side will be served as static content over the server's endpoint, and hence we do not have to provide the server's IP address or domain.
The URL path should be valid, where the server's APIs are hosted. If the endpoints for API have a
leading /v1/api and the server is running on localhost at port 3000, then you should use
http://localhost:3000/v1/api or /v1/api/ depending on whether it is production or development.
Server-Side Configurations
On the server-side, we need to configure 2 files - .env for secret keys and config.json for
chain and API rate limiting configurations.
Setup Environment Variables
Setup the environment variable with your private key and reCAPTCHA secret. Make a .env file in
your preferred location with the following credentials, as this file will not be committed to the
repository. The faucet server can handle multiple EVM chains, and therefore requires private keys
for addresses with funds on each of the chains.
If you have funds on the same address on every chain, then you can specify them with the single
variablePK. But if you have funds on different addresses on different chains, then you can provide
each of the private keys against the ID of the chain, as shown below.
C="C chain private key"
WAGMI="Wagmi chain private key"
PK="Sender Private Key with Funds in it"
CAPTCHA_SECRET="Google reCAPTCHA Secret"
PK will act as a fallback private key, in case, the key for any chain is not provided.
Setup EVM Chain Configurations
You can create a faucet server for any EVM chain by making changes in the config.json file. Add
your chain configuration as shown below in the evmchains object. Configuration for Fuji's C-Chain
and WAGMI chain is shown below for example.
"evmchains": [
    {
        "ID": "C",
        "NAME": "Fuji (C-Chain)",
        "TOKEN": "AVAX",
        "RPC": "https://api.avax-test.network/ext/C/rpc",
        "CHAINID": 43113,
        "EXPLORER": "https://testnet.snowtrace.io",
        "IMAGE": "/avaxred.png",
        "MAX_PRIORITY_FEE": "2000000000",
        "MAX_FEE": "100000000000",
        "DRIP_AMOUNT": 2000000000,
        "RECALIBRATE": 30,
        "RATELIMIT": {
            "MAX_LIMIT": 1,
            "WINDOW_SIZE": 1440
        }
    },
    {
        "ID": "WAGMI",
        "NAME": "WAGMI Testnet",
        "TOKEN": "WGM",
        "RPC": "https://subnets.avax.network/wagmi/wagmi-chain-testnet/rpc",
        "CHAINID": 11111,
        "EXPLORER": "https://subnets.avax.network/wagmi/wagmi-chain-testnet/explorer",
        "IMAGE": "/wagmi.png",
        "MAX_PRIORITY_FEE": "2000000000",
        "MAX_FEE": "100000000000",
        "DRIP_AMOUNT": 2000000000,
        "RATELIMIT": {
            "MAX_LIMIT": 1,
            "WINDOW_SIZE": 1440
        }
    }
]
In the above configuration drip amount is in nAVAX or gwei, whereas fees are in wei. For
example, with the above configurations, the faucet will send 1 AVAX with maximum fees per gas
being 100 nAVAX and priority fee as 2 nAVAX.
The rate limiter for C-Chain will only accept 1 request in 60 minutes for a particular API and 2 requests in 60 minutes for the WAGMI chain. Though it will skip any failed requests so that users can request tokens again, even if there is some internal error in the application. On the other hand, the global rate limiter will allow 15 requests per minute on every API. This time failed requests will also get counted so that no one can abuse the APIs.
API Endpoints
This server will expose the following APIs
Health API
The /health API will always return a response with a 200 status code. This endpoint can be used
to know the health of the server.
curl http://localhost:8000/health
Response
Server healthy
Get Faucet Address
This API will be used for fetching the faucet address.
curl http://localhost:8000/api/faucetAddress?chain=C
It will give the following response
0x3EA53fA26b41885cB9149B62f0b7c0BAf76C78D4
Get Faucet Balance
This API will be used for fetching the faucet address.
curl http://localhost:8000/api/getBalance?chain=C
It will give the following response
14282900936
Send Token
This API endpoint will handle token requests from users. It will return the transaction hash as a receipt of the faucet drip.
curl -d '{
        "address": "0x3EA53fA26b41885cB9149B62f0b7c0BAf76C78D4"
        "chain": "C"
}' -H 'Content-Type: application/json' http://localhost:8000/api/sendToken
Send token API requires a CAPTCHA response token that is generated using the CAPTCHA site key on the client-side. Since we can't generate and pass this token while making a curl request, we have to disable the CAPTCHA verification for testing purposes. You can find the steps to disable it in the next sections. The response is shown below
{
    "message": "Transaction successful on Avalanche C Chain!",
    "txHash": "0x3d1f1c3facf59c5cd7d6937b3b727d047a1e664f52834daf20b0555e89fc8317"
}
Rate Limiters (Important)
The rate limiters are applied on the global (all endpoints) as well as on the /api/sendToken API.
These can be configured from the config.json file. Rate limiting parameters for chains are passed
in the chain configuration as shown above.
"GLOBAL_RL": {
    "ID": "GLOBAL",
    "RATELIMIT": {
        "REVERSE_PROXIES": 4,
        "MAX_LIMIT": 40,
        "WINDOW_SIZE": 1,
        "PATH": "/",
        "SKIP_FAILED_REQUESTS": false
    }
}
There could be multiple proxies between the server and the client. The server will see the IP address of the adjacent proxy connected with the server, and this may not be the client's actual IP.
The IPs of all the proxies that the request has hopped through are stuffed inside the header x-forwarded-for array. But the proxies in between can easily manipulate these headers to bypass rate limiters. So, we cannot trust all the proxies and hence all the IPs inside the header.
The proxies that are set up by the owner of the server (reverse-proxies) are the trusted proxies on
which we can rely and know that they have stuffed the actual IP of the callers in between. Any
proxy that is not set up by the server, should be considered an untrusted proxy. So, we can jump to
the IP address added by the last proxy that we trust. The number of jumps that we want can be
configured in the config.json file inside the GLOBAL_RL object.
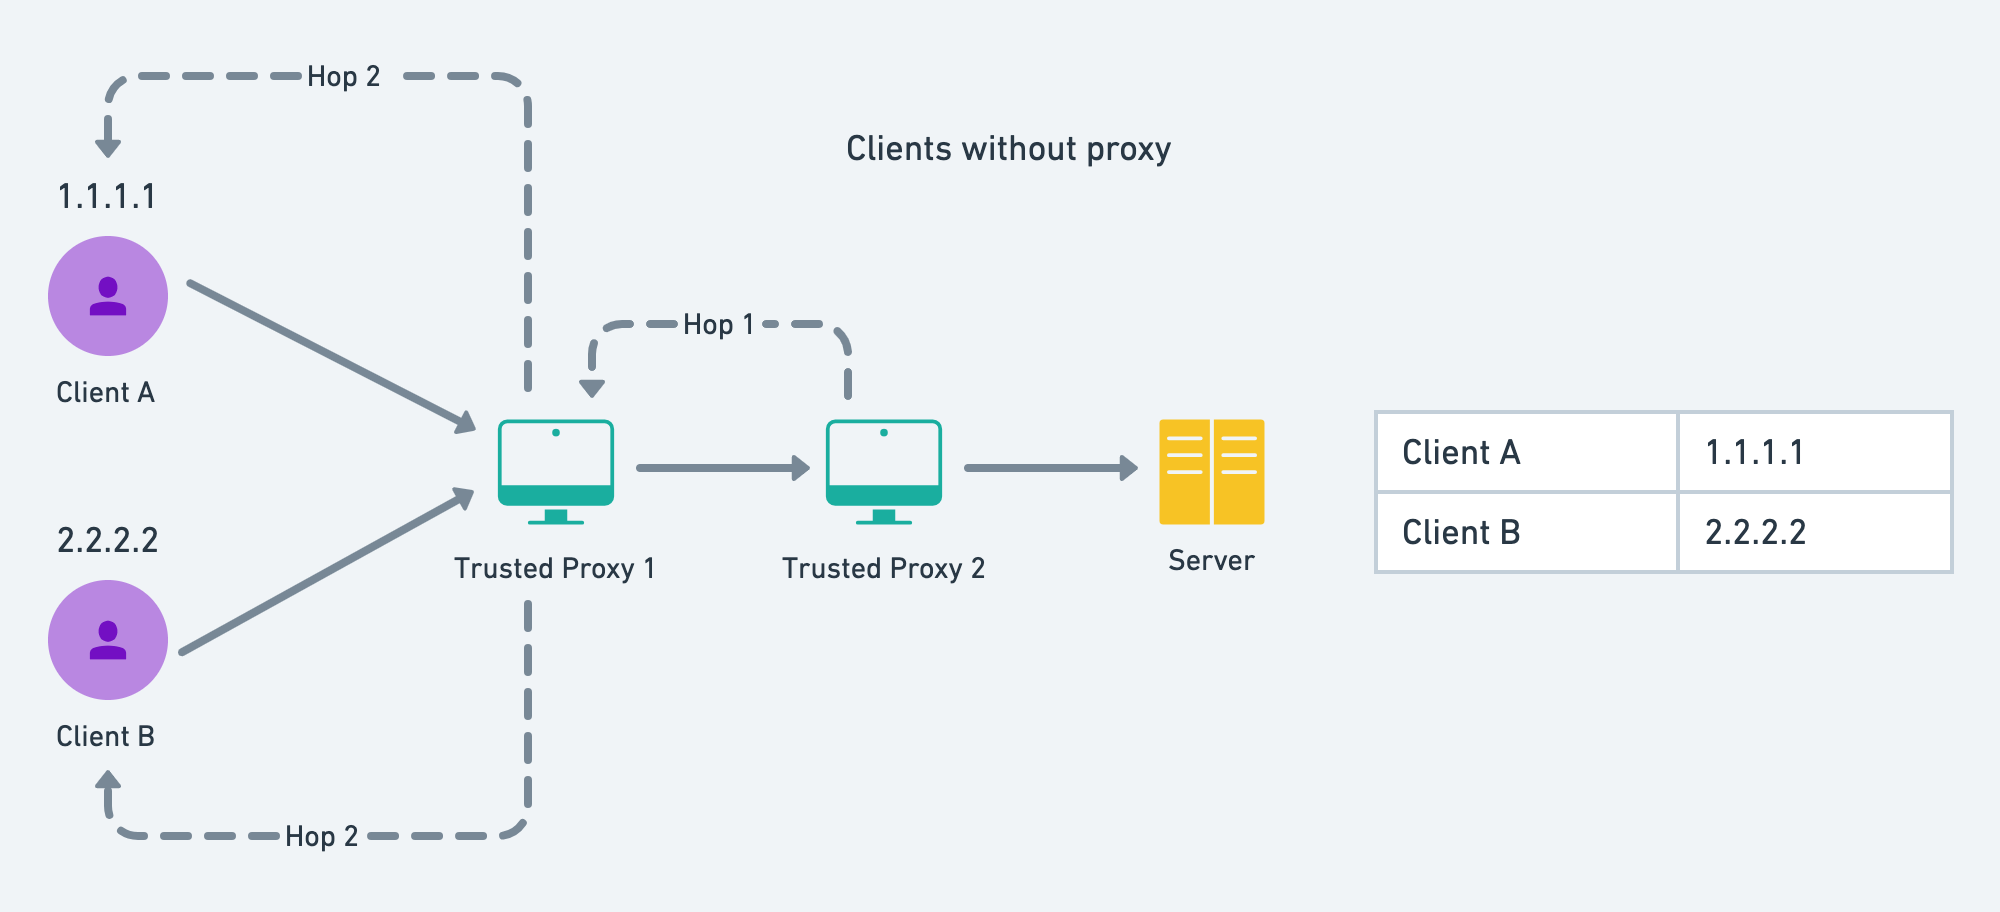
Clients Behind Same Proxy
Consider the below diagram. The server is set up with 2 reverse proxies. If the client is behind proxies, then we cannot get the client's actual IP, and instead will consider the proxy's IP as the client's IP. And if some other client is behind the same proxy, then those clients will be considered as a single entity and might get rate-limited faster.
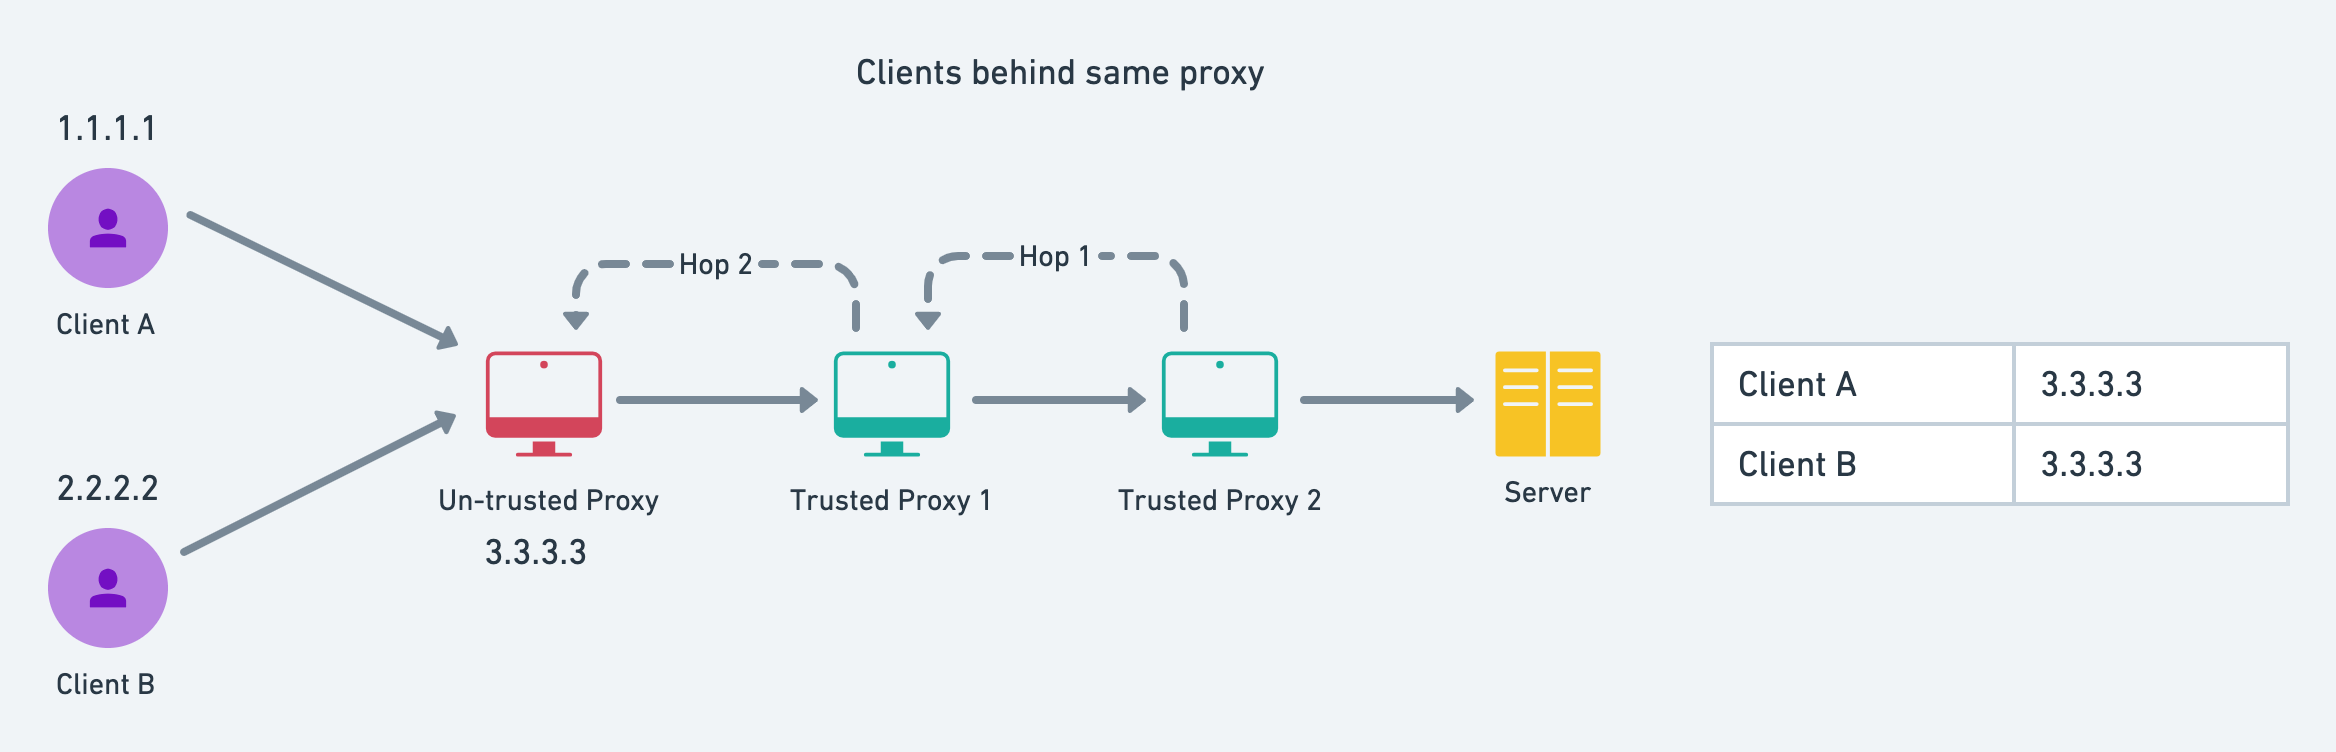
Therefore it is advised to the users, to avoid using any proxy for accessing applications that have critical rate limits, like this faucet.
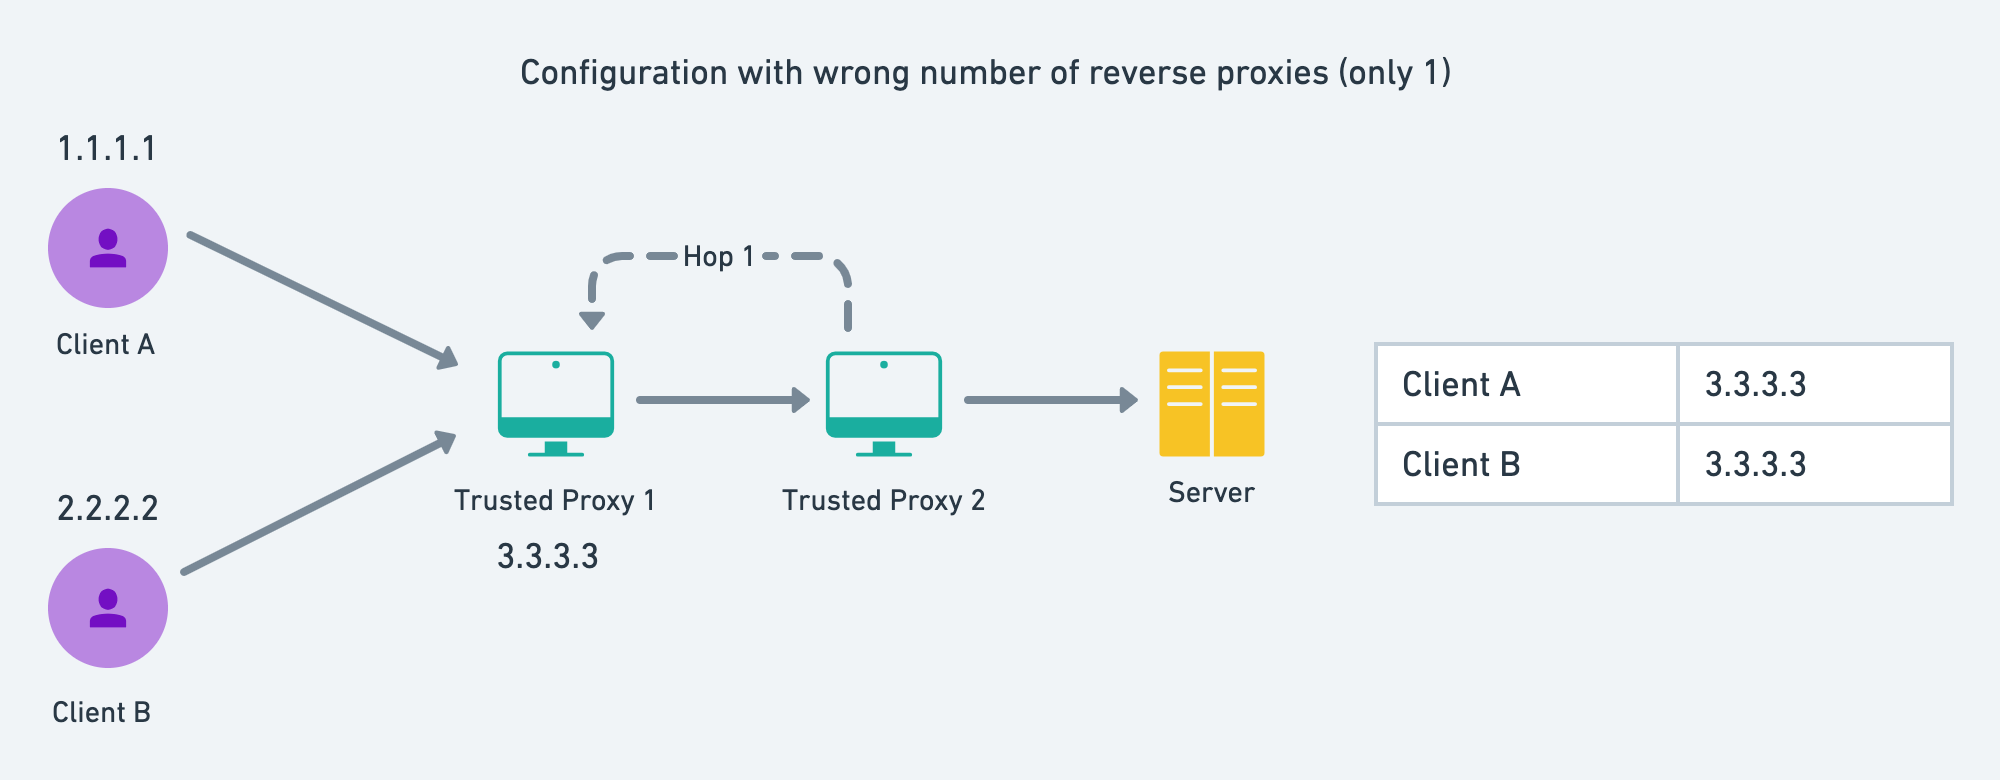
Wrong Number of Reverse Proxies
So, if you want to deploy this faucet, and have some reverse proxies in between, then you should
configure this inside the GLOBAL_RL key of the config.json file. If this is not configured
properly, then the users might get rate-limited very frequently, since the server-side proxy's IP
addresses are being viewed as the client's IP. You can verify this in the code
here.
"GLOBAL_RL": {
    "ID": "GLOBAL",
    "RATELIMIT": {
        "REVERSE_PROXIES": 4,
        ...
It is also quite common to have Cloudflare as the last reverse proxy or the exposed server. Cloudflare provides a header cf-connecting-ip which is the IP of the client that requested the faucet and hence Cloudflare. We are using this as default.
CAPTCHA Verification
CAPTCHA is required to prove the user is a human and not a bot. For this purpose, we will use
Google's reCAPTCHA. The server-side will require
CAPTCHA_SECRET that should not be exposed. You can set the threshold score to pass the CAPTCHA
test by the users
here.
You can disable these CAPTCHA verifications and rate limiters for testing the purpose, by tweaking
in the server.ts file.
Disabling Rate Limiters
Comment or remove these 2 lines from the server.ts file
new RateLimiter(app, [GLOBAL_RL]);
new RateLimiter(app, evmchains);
Disabling CAPTCHA Verification
Remove the captcha.middleware from sendToken API.
Starting the Faucet
Follow the below commands to start your local faucet.
Installing Dependencies
This will concurrently install dependencies for both client and server.
npm install
If ports have a default configuration, then the client will start at port 3000 and the server will start at port 8000 while in development mode.
Starting in Development Mode
This will concurrently start the server and client in development mode.
npm run dev
Building for Production
The following command will build server and client at build/ and build/client directories.
npm run build
Starting in Production Mode
This command should only be run after successfully building the client and server-side code.
npm start
Setting up with Docker
Follow the steps to run this application in a Docker container.
Build Docker Image
Docker images can be served as the built versions of our application, that can be used to deploy on Docker container.
docker build . -t faucet-image
Starting Application inside Docker Container
Now we can create any number of containers using the above faucet image. We also have to supply
the .env file or the environment variables with the secret keys to create the container. Once the
container is created, these variables and configurations will be persisted and can be easily started
or stopped with a single command.
docker run -p 3000:8000 --name faucet-container --env-file ../.env faucet-image
The server will run on port 8000, and our Docker will also expose this port for the outer world to
interact. We have exposed this port in the Dockerfile. But we cannot directly interact with the
container port, so we had to bind this container port to our host port. For the host port, we have
chosen 3000. This flag -p 3000:8000 achieves the same.
This will start our faucet application in a Docker container at port 3000 (port 8000 on the container). You can interact with the application by visiting [http://localhost:3000] in your browser.
Stopping the Container
You can easily stop the container using the following command
docker stop faucet-container
Restarting the Container
To restart the container, use the following command
docker start faucet-container
Using the Faucet
Using the faucet is quite straightforward, but for the sake of completeness, let's go through the steps, to collect your first test coins.
Visit Avalanche Faucet Site
Go to https://faucet.avax.network. You will see various network parameters like network name, faucet balance, drop amount, drop limit, faucet address, etc.
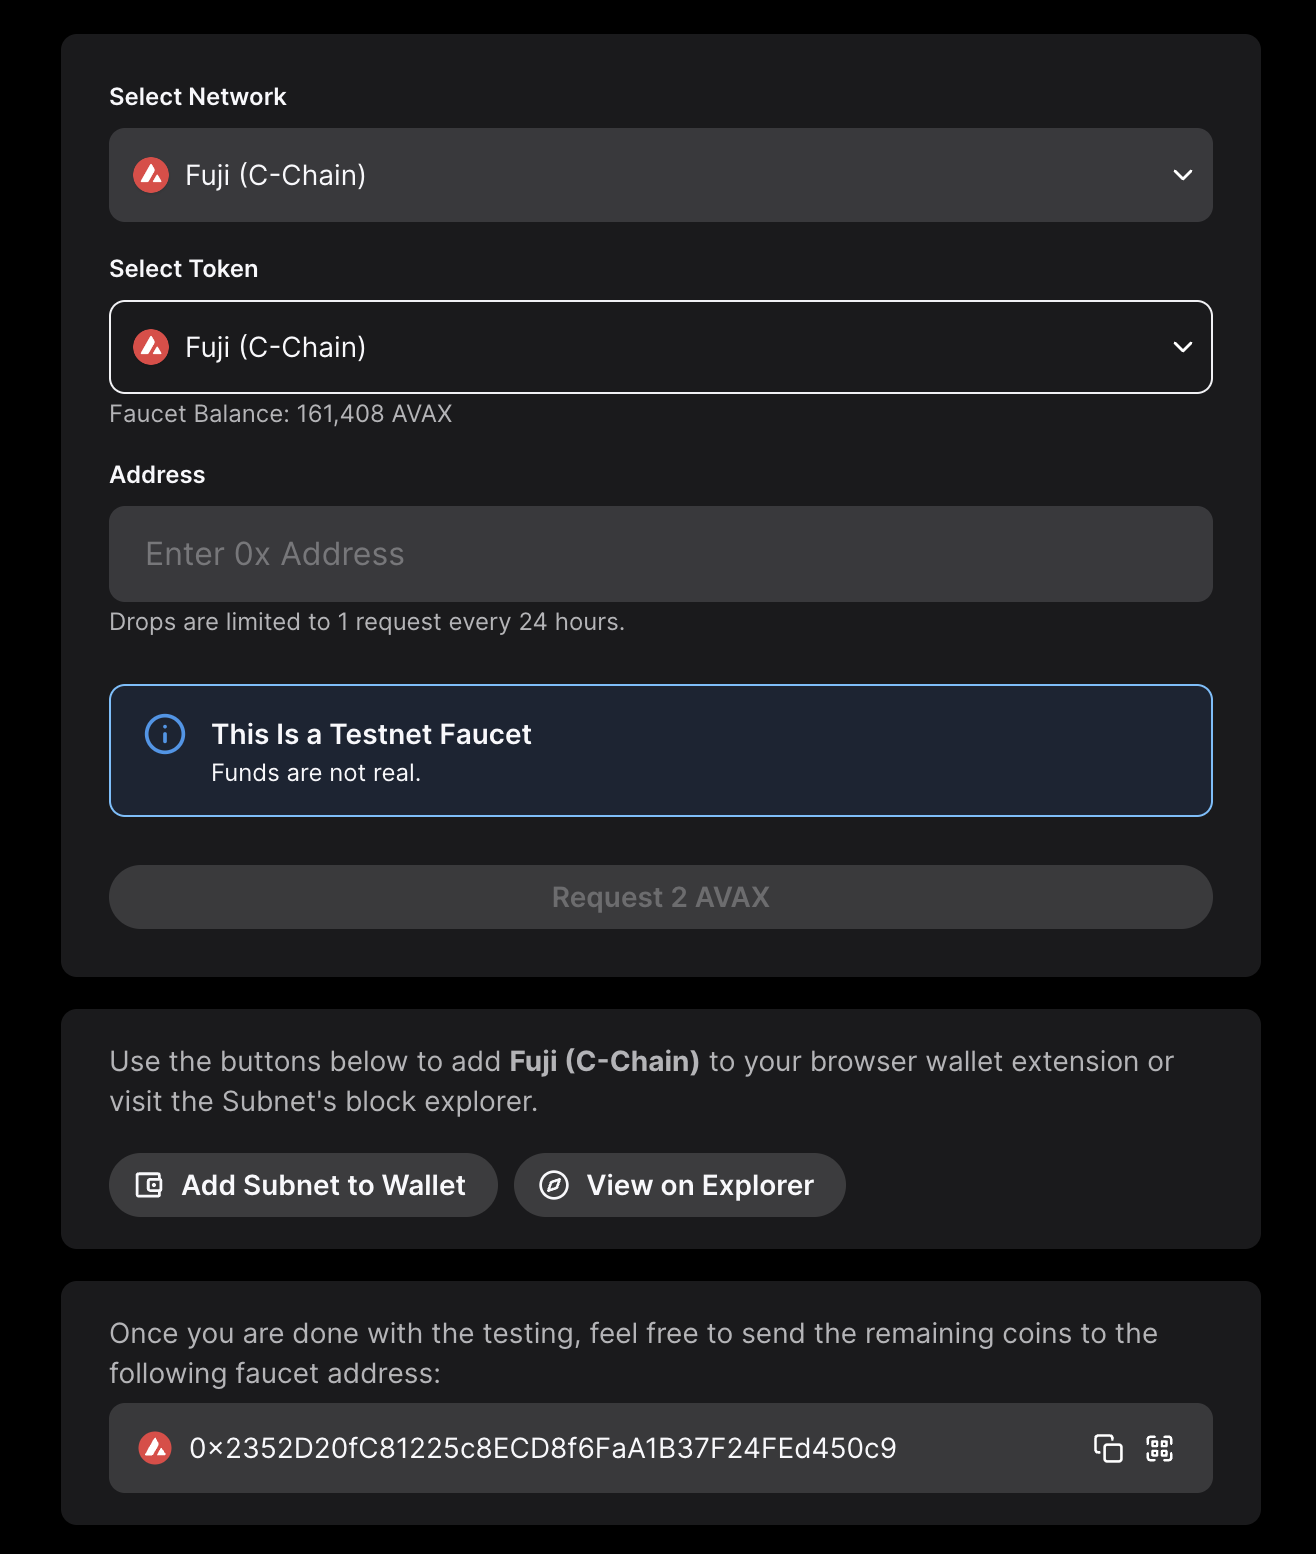
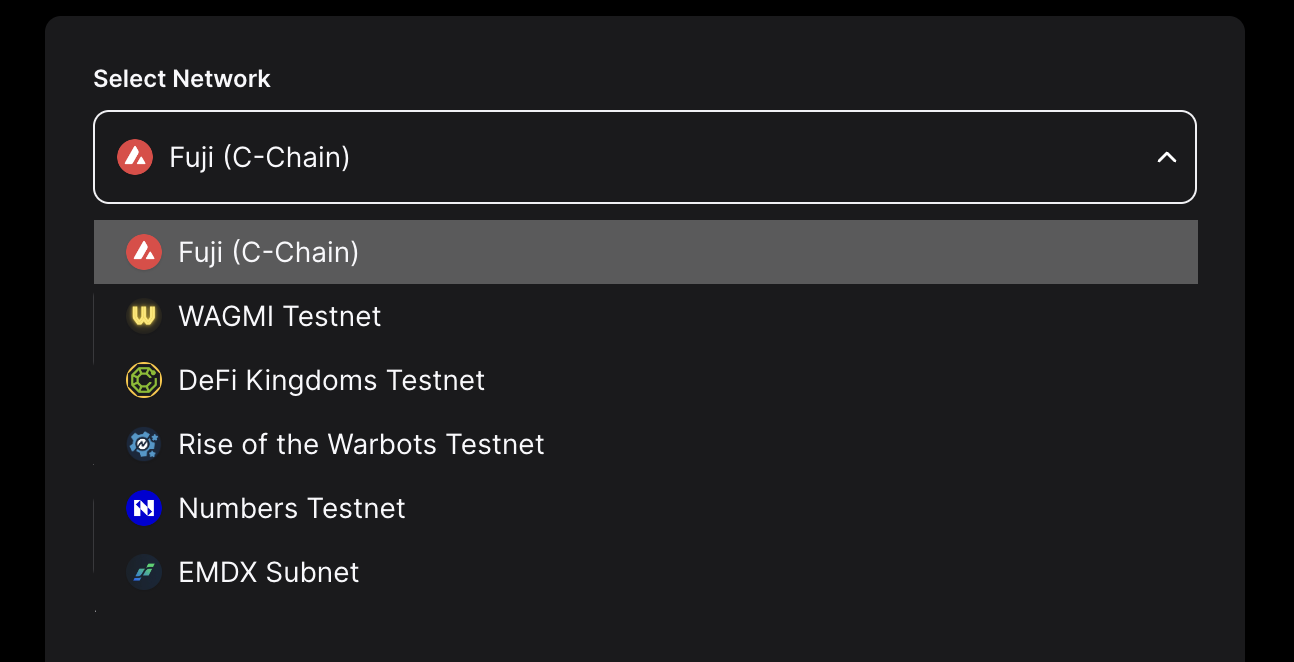
Select Network
You can use the dropdown to select the network of your choice and get some free coins (each network may have a different drop amount).
Put Address and Request Coins
If you already have an AVAX balance greater than zero on Mainnet, paste your C-Chain address there, and request test tokens. Otherwise, please request a faucet coupon on Guild. Admins and mods on the official Discord can provide testnet AVAX if developers are unable to obtain it from the other two options.
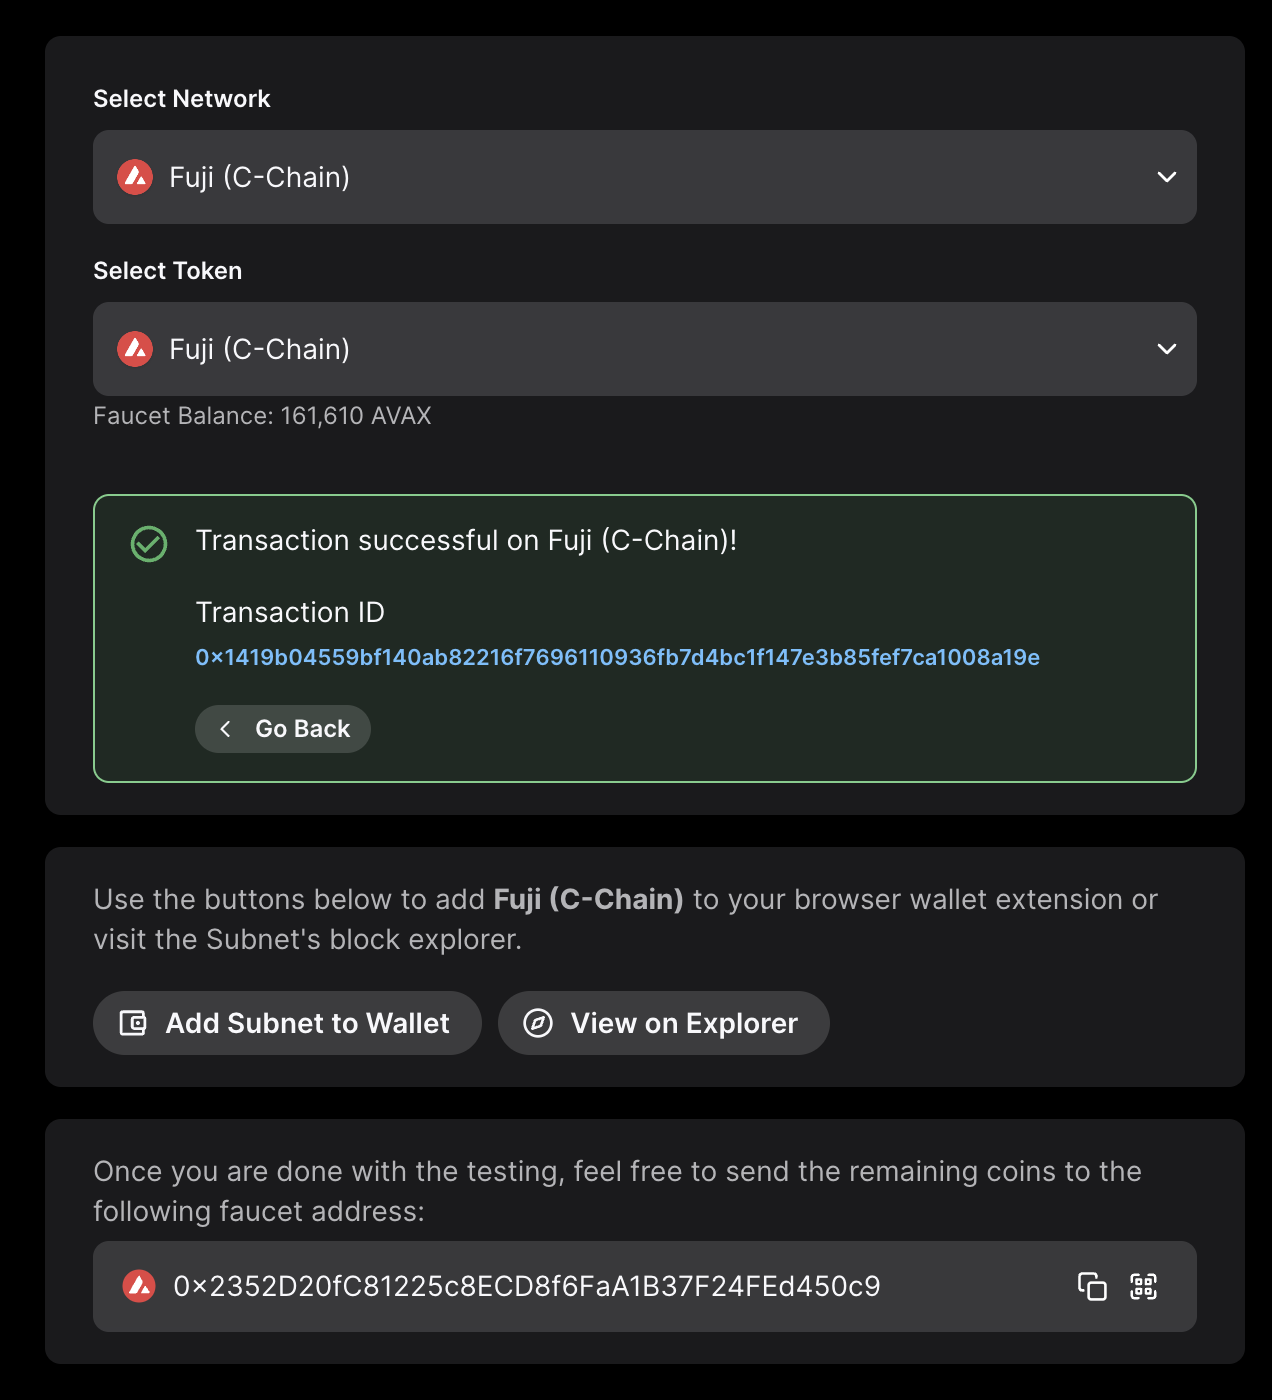
Within a second, you will get a transaction hash for the processed transaction. The hash would be a hyperlink to Subnet's explorer. You can see the transaction status, by clicking on that hyperlink.
More Interactions
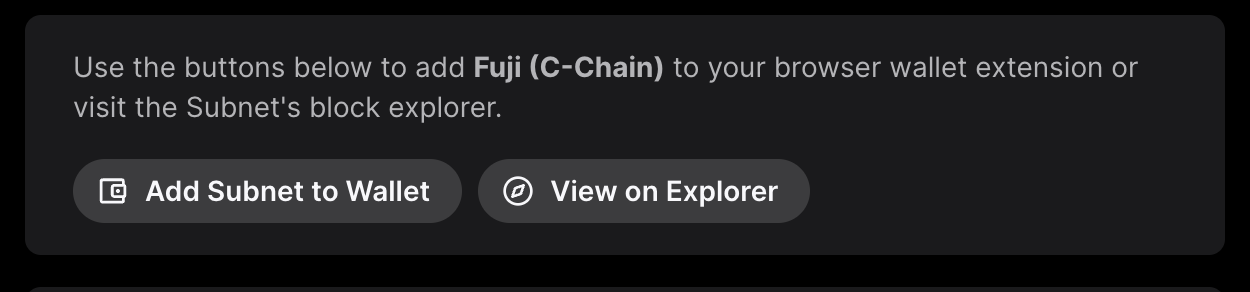
This is not just it. Using the buttons shown below, you can go to the Subnet explorer or add the Subnet to your browser wallet extensions like Core or MetaMask with a single click.
Probable Errors and Troubleshooting
Errors are not expected, but if you are facing some of the errors shown, then you could try troubleshooting as shown below. If none of the troubleshooting works, reach us through Discord.
-
Too many requests. Please try again after X minutes This is a rate-limiting message. Every Subnet can set its drop limits. The above message suggests that you have reached your drop limit, that is the number of times you could request coins within the window of X minutes. You should try requesting after X minutes. If you are facing this problem, even when you are requesting for the first time in the window, you may be behind some proxy, Wi-Fi, or VPN service that is also being used by some other user.
-
CAPTCHA verification failed! Try refreshing We are using v3 of Google's reCAPTCHA. This version uses scores between 0 and 1 to rate the interaction of humans with the site, with 0 being the most suspicious one. You do not have to solve any puzzle or mark the I am not a Robot checkbox. The score will be automatically calculated. We want our users to score at least 0.3 to use the faucet. This is configurable, and we will update the threshold after having broader data. But if you are facing this issue, then you can try refreshing your page, disabling ad-blockers, or switching off any VPN. You can follow this guide to get rid of this issue.
-
Internal RPC error! Please try after sometime This is an internal error in the Subnet's node, on which we are making an RPC for sending transactions. A regular check will update the RPC's health status every 30 seconds (default) or whatever is set in the configuration. This may happen only in rare scenarios and you cannot do much about it, rather than waiting.
-
Timeout of 10000ms exceeded There could be many reasons for this message. It could be an internal server error, or the request didn't receive by the server, slow internet, etc. You could try again after some time, and if the problem persists, then you should raise this issue on our Discord server.
-
Couldn't see any transaction status on explorer The transaction hash that you get for each drop is pre-computed using the expected nonce, amount, and receiver's address. Though transactions on Avalanche are near-instant, the explorer may take time to index those transactions. You should wait for a few more seconds, before raising any issue or reaching out to us.
Was this page helpful?