Add a Node to the Validator Set
Introduction
The Primary Network is inherent to the Avalanche platform and validates Avalanche’s built-in blockchains. In this tutorial, we’ll add a node to the Primary Network on Avalanche.
The P-Chain manages metadata on Avalanche. This includes tracking which nodes are in which Subnets, which blockchains exist, and which Subnets are validating which blockchains. To add a validator, we’ll issue transactions to the P-Chain.
Note that once you issue the transaction to add a node as a validator, there is no way to change the parameters. You can’t remove your stake early or change the stake amount, node ID, or reward address. Please make sure you’re using the correct values in the API calls below. If you’re not sure, feel free to join our Discord to ask questions.
Requirements
You've completed Run an Avalanche Node and are familiar with Avalanche's architecture. In this tutorial, we use AvalancheJS and Avalanche’s Postman collection to help us make API calls.
In order to ensure your node is well-connected, make sure that your node can
receive and send TCP traffic on the staking port (9651 by default) and your node
has a public IP address(it's optional to set --public-ip=[YOUR NODE'S PUBLIC IP HERE]
when executing the AvalancheGo binary, as by default, the node will attempt to perform
NAT traversal to get the node's IP according to its router). Failing to do either of
these may jeopardize your staking reward.
Add a Validator with Core extension
First, we show you how to add your node as a validator by using Core web.
Retrieve the Node ID, the BLS signature and the BLS key
Get this info by calling info.getNodeID:
curl -X POST --data '{
    "jsonrpc":"2.0",
    "id"     :1,
    "method" :"info.getNodeID"
}' -H 'content-type:application/json' 127.0.0.1:9650/ext/info
The response has your node’s ID, the BLS key (public key) and the BLS signature (proof of possession):
{
  "jsonrpc": "2.0",
  "result": {
    "nodeID": "NodeID-5mb46qkSBj81k9g9e4VFjGGSbaaSLFRzD",
    "nodePOP": {
      "publicKey": "0x8f95423f7142d00a48e1014a3de8d28907d420dc33b3052a6dee03a3f2941a393c2351e354704ca66a3fc29870282e15",
      "proofOfPossession": "0x86a3ab4c45cfe31cae34c1d06f212434ac71b1be6cfe046c80c162e057614a94a5bc9f1ded1a7029deb0ba4ca7c9b71411e293438691be79c2dbf19d1ca7c3eadb9c756246fc5de5b7b89511c7d7302ae051d9e03d7991138299b5ed6a570a98"
    }
  },
  "id": 1
}
Add as a Validator
Connect Core extension to Core web, and go the 'Staking' tab. Here, choose 'Validate' from the menu.
Fill out the staking parameters. They are explained in more detail in this doc. When you’ve
filled in all the staking parameters and double-checked them, click Submit Validation. Make sure the staking period is at
least 2 weeks, the delegation fee rate is at least 2%, and you’re staking at
least 2,000 AVAX on Mainnet (1 AVAX on Fuji Testnet). A full guide about this can be found
here.
You should see a success message, and your balance should be updated.
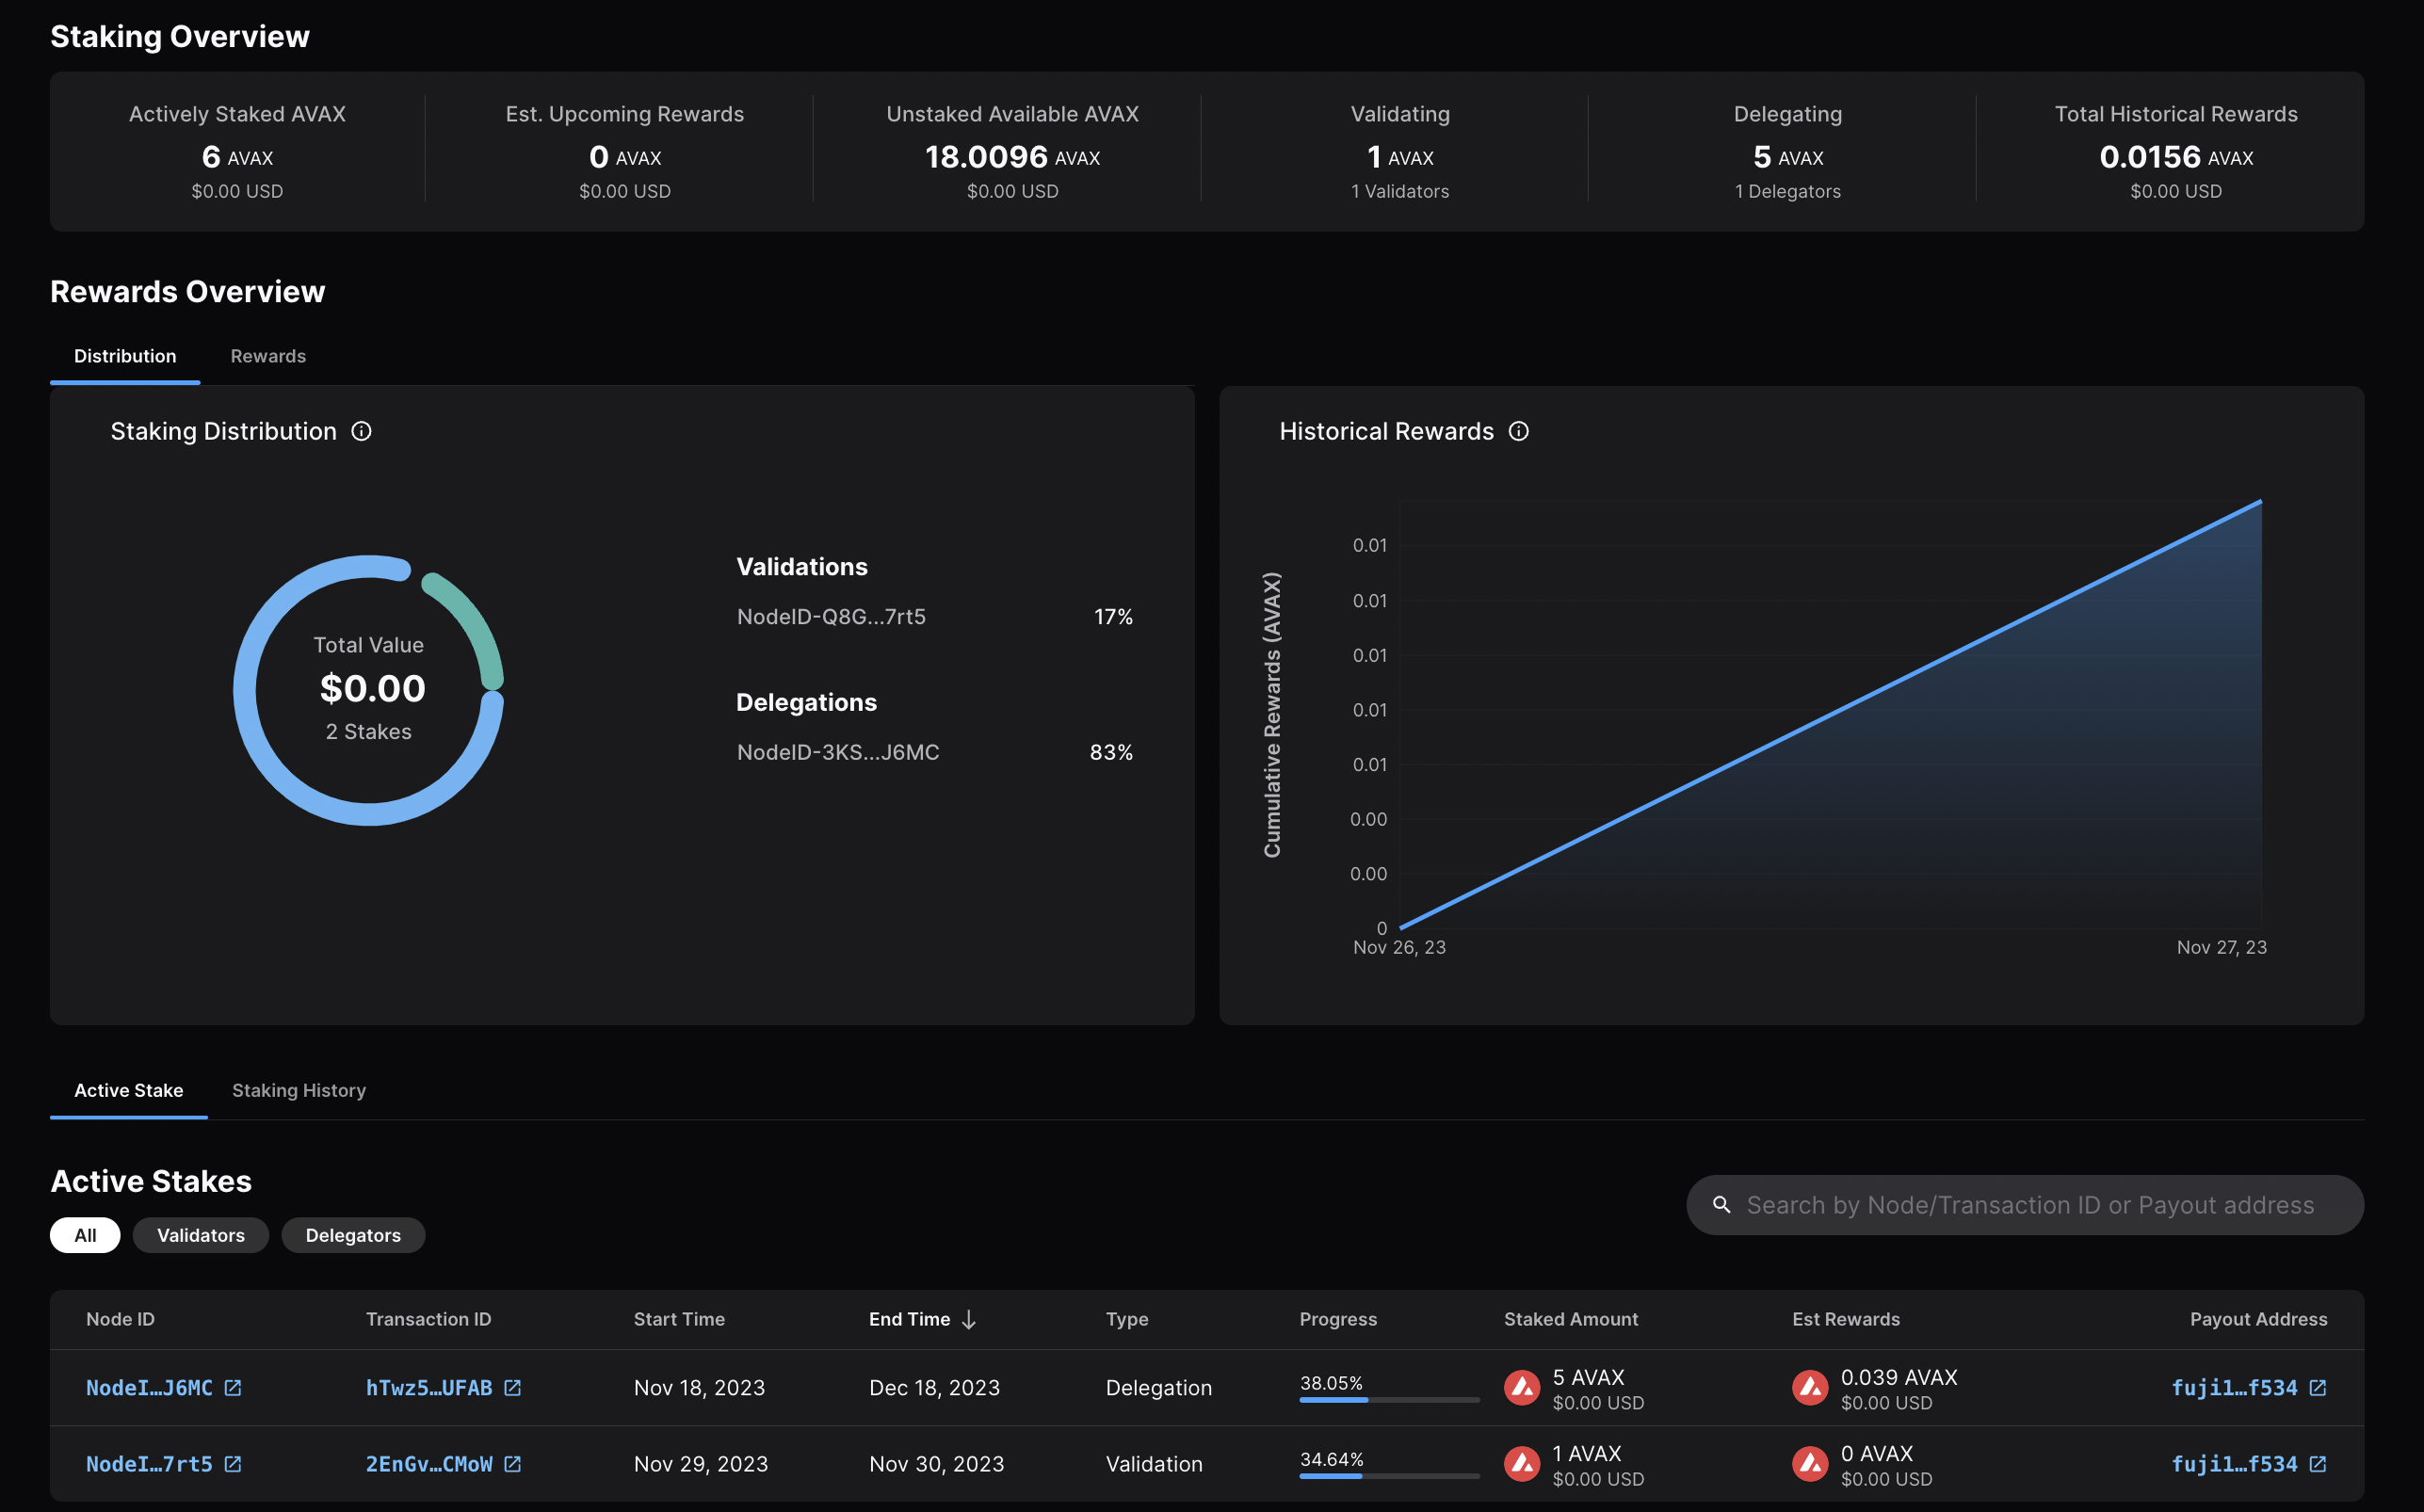
Go back to the Stake tab, and you'll see here an overview of your validation,
with information like the amount staked, staking time, and more.
Calling
platform.getPendingValidators
verifies that your transaction was accepted. Note that this API call should be
made before your node's validation start time, otherwise, the return will not
include your node's id as it is no longer pending.
You can also call
platform.getCurrentValidators
to check that your node's id is included in the response.
That’s it!
Add a Validator with AvalancheJS
We can also add a node to the validator set using AvalancheJS.
Install AvalancheJS
To use AvalancheJS, you can clone the repo:
git clone https://github.com/ava-labs/avalanchejs.git
The repository cloning method used is HTTPS, but SSH can be used too:
git clone [email protected]:ava-labs/avalanchejs.git
You can find more about SSH and how to use it here.
or add it to an existing project:
yarn add @avalabs/avalanchejs
For this tutorial we will use ts-node
to run the example scripts directly from an AvalancheJS directory.
Fuji Workflow
In this section, we will use Fuji Testnet to show how to add a node to the validator set.
Open your AvalancheJS directory and select the
examples/p-chain
folder to view the source code for the examples scripts.
We will use the
validate.ts
script to add a validator.
Add Necessary Environment Variables
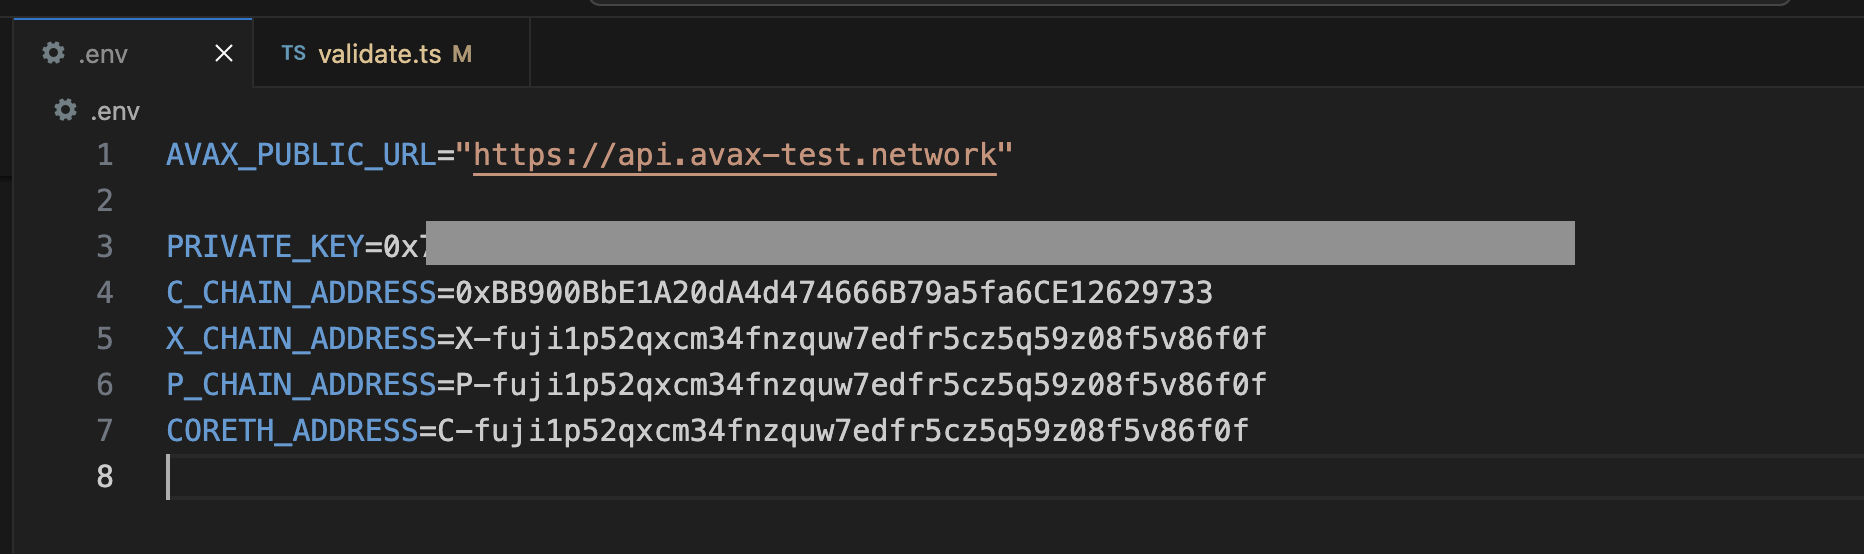
Locate the .env.example file at the root of AvalancheJS, and remove .example
from the title. Now, this will be the .env file for global variables.
Add the private key and the P-Chain address associated with it.
The API URL is already set to Fuji (https://api.avax-test.network/).
Retrieve the Node ID, the BLS signature and the BLS key
Get this info by calling info.getNodeID:
curl -X POST --data '{
    "jsonrpc":"2.0",
    "id"     :1,
    "method" :"info.getNodeID"
}' -H 'content-type:application/json' 127.0.0.1:9650/ext/info
The response has your node’s ID, the BLS key (public key) and the BLS signature (proof of possession):
{
  "jsonrpc": "2.0",
  "result": {
    "nodeID": "NodeID-JXJNyJXhgXzvVGisLkrDiZvF938zJxnT5",
    "nodePOP": {
      "publicKey": "0xb982b485916c1d74e3b749e7ce49730ac0e52d28279ce4c5c989d75a43256d3012e04b1de0561276631ea6c2c8dc4429",
      "proofOfPossession": "0xb6cdf3927783dba3245565bd9451b0c2a39af2087fdf401956489b42461452ec7639b9082195b7181907177b1ea09a6200a0d32ebbc668d9c1e9156872633cfb7e161fbd0e75943034d28b25ec9d9cdf2edad4aaf010adf804af8f6d0d5440c5"
    }
  },
  "id": 1
}
Fill in the Node ID, the BLS signature and the BLS key
After retrieving this data, go to examples/p-chain/validate.ts.
Replace the nodeID, blsPublicKey and blsSignature with your
own node's values.

Settings for Validation
Next we need to specify the node's validation period and delegation fee.
Validation Period
The validation period is set by default to 21 days, the start date being the date and time the transaction is issued. The start date cannot be modified.
The end date can be adjusted in the code.
Let's say we want the validation period to end after 50 days.
You can achieve this by adding the number of desired days to
endTime.getDate(), in this case 50.
// move ending date 50 days into the future
endTime.setDate(endTime.getDate() + 50);
Now let's say you want the staking period to end on a specific date and time, for example May 15, 2024, at 11:20 AM. It can be achieved as shown in the code below.
const startTime = await new PVMApi().getTimestamp();
const startDate = new Date(startTime.timestamp);
const start = BigInt(startDate.getTime() / 1000);

// Set the end time to a specific date and time
const endTime = new Date('2024-05-15T11:20:00'); // May 15, 2024, at 11:20 AM
const end = BigInt(endTime.getTime() / 1000);
Delegation Fee Rate
Avalanche allows for delegation of stake. This parameter is the percent fee this
validator charges when others delegate stake to them. For example, if
delegationFeeRate is 10 and someone delegates to this validator, then when
the delegation period is over, 10% of the reward goes to the validator and the
rest goes to the delegator, if this node meets the validation reward
requirements.
The delegation fee on AvalancheJS is set 20. To change this, you need
to provide the desired fee percent as a parameter to newAddPermissionlessValidatorTx,
which is by default 1e4 * 20.
For example, if you'd want it to be 10, the updated code would look like this:
const tx = newAddPermissionlessValidatorTx(
    context,
    utxos,
    [bech32ToBytes(P_CHAIN_ADDRESS)],
    nodeID,
    PrimaryNetworkID.toString(),
    start,
    end,
    BigInt(1e9),
    [bech32ToBytes(P_CHAIN_ADDRESS)],
    [bech32ToBytes(P_CHAIN_ADDRESS)],
    1e4 * 10, // delegation fee, replaced 20 with 10
    undefined,
    1,
    0n,
    blsPublicKey,
    blsSignature,
  );
Stake Amount
Set the amount being locked for validation when calling
newAddPermissionlessValidatorTx by replacing weight with a number
in the unit of nAVAX. For example, 2 AVAX would be 2e9 nAVAX.
  const tx = newAddPermissionlessValidatorTx(
    context,
    utxos,
    [bech32ToBytes(P_CHAIN_ADDRESS)],
    nodeID,
    PrimaryNetworkID.toString(),
    start,
    end,
    BigInt(2e9), // the amount to stake
    [bech32ToBytes(P_CHAIN_ADDRESS)],
    [bech32ToBytes(P_CHAIN_ADDRESS)],
    1e4 * 10,
    undefined,
    1,
    0n,
    blsPublicKey,
    blsSignature,
  );
Execute the Code
Now that we have made all of the necessary changes to the example script, it's time to add a validator to the Fuji Network.
Run the command:
node --loader ts-node/esm examples/p-chain/validate.ts
The response:
laviniatalpas@Lavinias-MacBook-Pro avalanchejs % node --loader ts-node/esm examples/p-chain/validate.ts
(node:87616) ExperimentalWarning: `--experimental-loader` may be removed in the future; instead use `register()`:
--import 'data:text/javascript,import { register } from "node:module"; import { pathToFileURL } from "node:url"; register("ts-node/esm", pathToFileURL("./"));'
(Use `node --trace-warnings ...` to show where the warning was created)
{ txID: 'RVe3CFRieRbBvKXKPu24Zbt1QehdyGVT6X4tPWVBeACPX3Ab8' }
We can check the transaction’s status by running the example script with
platform.getTxStatus
or looking up the validator directly on the
explorer.

Mainnet Workflow
The Fuji workflow above can be adapted to Mainnet with the following modifications:
AVAX_PUBLIC_URLshould behttps://api.avax.network/.P_CHAIN_ADDRESSshould be the Mainnet P-Chain address.- Set the correct amount to stake.
- The
blsPublicKey,blsSignatureandnodeIDneed to be the ones for your Mainnet Node.
Was this page helpful?